
Key Takeaways
- Geocoded zip codes in Salesforce enable personalized marketing and CRM insights
- GeoPostcodes integration optimizes territories, sales, and service delivery
- Zip code mapping analyzes revenue and segments customers in Salesforce
- Geocoded data. can filter customers by location for targeted promotional campaigns
Introduction
Most software solutions are only as good as the data you put into them, and your CRM is no different.
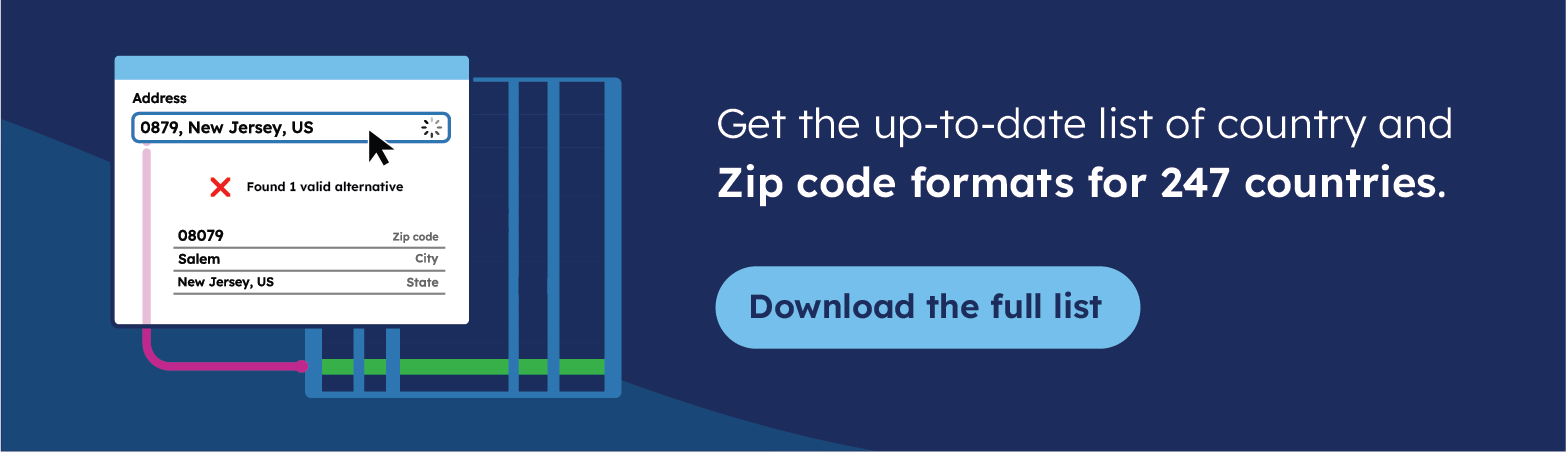
One way to improve a CRM is to add accurate geocoded zip codes to your accounts. It allows you to segment your customers and prospects by regions, countries, and zip codes to personalize your marketing campaigns, offer targeted promotions, and better understand your customer base. You can also use it to map sales territories, distribution centers, and customers to optimize your sales operations, reduce travel costs, and improve your customer service.
💡 For over 15 years, we have created the most comprehensive worldwide zip code database. Our location data is updated weekly, relying on more than 1,500 sources. Browse GeoPostcodes datasets and download a free sample here.
Clean address data is essential for setting up correct SLAs and accurate shipping and direct mail. It even allows you to map contacts to the appropriate time zone.
For Salesforce specifically, adding zip code coordinates lets you leverage features like its territory planning for creating and managing sales territories, optimizing sales coverage, and improving efficiency.
In this tutorial, you’ll learn how to add geocoded zip codes from GeoPostcodes to Salesforce. You will see how to:
- obtain geocoded zip codes from GeoPostcodes and import them into Salesforce
- map the zip code coordinates to account information for a fictitious coffee company in Brazil
- use the mapped data to filter and segment your
Accountsdata
You can find the code for this tutorial in this GitHub repo.
The Power of Zip Code Data
Wielding Demographic Information with Zip Codes
One of the benefits of using zip code data in Salesforce is that you can access demographic information about each zip code area. Demographic information is data that describes the characteristics of a population, such as age, gender, race, ethnicity, income, education, occupation, household size, marital status, etc.
Demographic information can help you segment your customers based on their needs, preferences, and behaviors. For example, you can use demographic information to identify which zip code areas have a high concentration of young professionals who are likely to buy your premium products or which zip code areas have a large number of families who need your services.
Revenue Analysis and Customer Segmentation by Zip Code
Another benefit of using zip code data in Salesforce is that you can analyze your revenue and customer segmentation by zip code area. Revenue analysis measures and evaluates your sales performance based on various criteria, such as product, channel, region, etc. Customer segmentation is dividing your customers into groups based on their similarities or differences, such as needs, preferences, behaviors, etc.
Revenue analysis and customer segmentation can help you identify your most profitable and loyal customers, discover new growth opportunities, and optimize your marketing and sales campaigns.
How do you perform revenue analysis and customer segmentation by zip code area? You can use Salesforce’s reporting and dashboard features to create custom reports and charts that show your revenue and customer data by zip code area. You can also use Salesforce’s artificial intelligence tool, Einstein, which automatically generates insights and recommendations based on your data.
For example, Einstein can show you which zip code areas have the highest or lowest revenue growth rate, which zip code areas have the most or least potential for cross-selling or upselling, which zip code areas have the best or worst customer satisfaction scores, etc.
Prerequisites
To follow along, make sure you have the following accounts:
GeoPostcodes’ free 30-day trial will give you access to the sample data you’ll use in this tutorial.
Obtaining Geocoded Zip Codes from GeoPostcodes
To start, you need to obtain geocoded zip code data.
Obtaining accurate data isn’t always as simple as it seems, though. If you’re operating on a small scale, you might have access to a data set from your local postal service or the like, if you’re lucky. However, you have to ensure it’s accurate enough for your purposes, up-to-date, and standardized.
If you’re operating on a global scale, the challenge of sourcing postal data of the required quality across multiple countries becomes time-consuming and costly. Creating a structured and coherent data set is even more complex.
So even though the example use cases of this tutorial are pretty simple, you’ll be following best practices and using high-quality zip code coordinates from a reputable source, GeoPostcodes. GeoPostcodes provides accurate and up-to-date postal data worldwide, covering more than 240 countries. Its reliable and structured location master data gives you access to high-quality postal, street, and boundary data across multiple countries and languages in one coherent format.
To get the geocoded zip codes you’ll be using for this tutorial, sign in to the GeoPostcodes customer portal.
Click on Download Center and select Postal Database. You can download either a continent package or a ZIP file for individual countries. Scroll down, look for Brazil, click on it, and select Download on the next screen. Unzip the downloaded file to see something like the screenshot below:
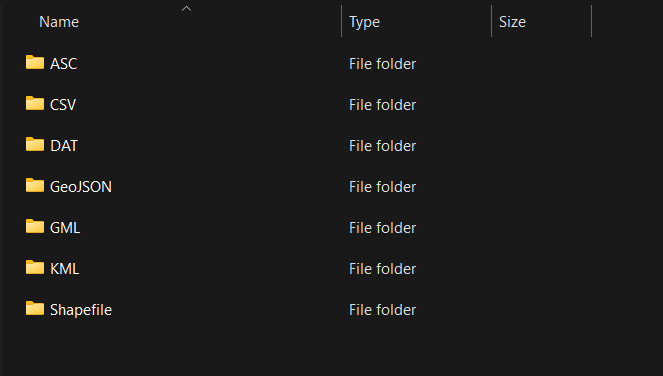
Refer to the GeoPostcodes Postal Data reference to learn more about the files included.
The file you’ll use for this tutorial is in the CSV folder titled GPC-PLACES-GEO_SAMPLE-BR.csv. It contains the following fields:
iso;country;language;id;region1;region2;region3;region4;locality;postcode;suburb;latitude;longitude;elevation;iso2;fips;nuts;hasc;stat;timezone;utc;dst;locality_type;is_postal;is_business;is_po_box;post_town
For this tutorial, you’ll use the postcode (zip/postal code), latitude (zip code latitude using WGS 84 coordinates), and longitude (zip code longitude using WGS 84 coordinates) fields to map latitude and longitude data to Salesforce client accounts using their billing zip codes.
Importing Zip Codes latitude and longitude to Salesforce
Next, you’ll import the CSV file from the previous step into Salesforce onto a custom object type named GeoPostcodes that you’ll create. Custom object types in Salesforce allow the storage of nontraditional data not covered by standard Salesforce objects, in this case, the imported postcodes.
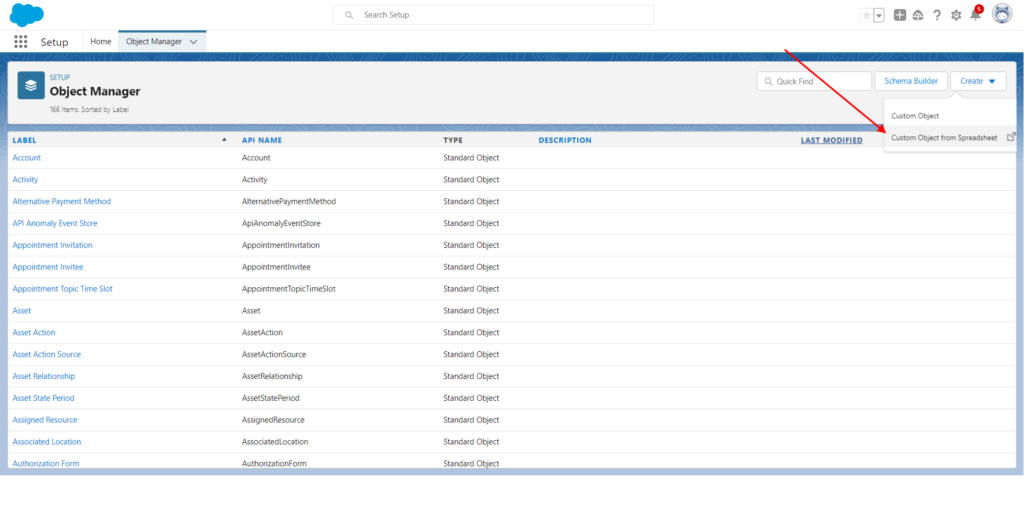
Log in to your Salesforce account and click the Object Manager tab. Click Create on the top right and select Custom Object from Spreadsheet.
On the initial screen, choose Upload and select the file you obtained in the previous step, namely GPC-PLACES-GEO_SAMPLE-BR.csv. In the dropdown for Values Separated By, make sure that you select Semicolon. This will enable Salesforce’s data import tool to read the field names and map them to the data correctly.

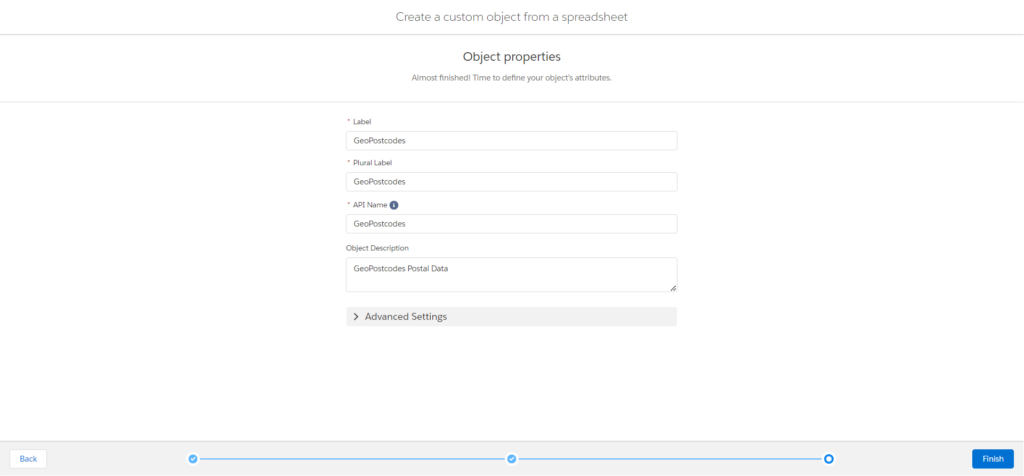
Ensure all fields are mapped to the right type. For this tutorial, make sure postcode is set to Text, and latitude and longitude are set to Decimal. Select Text as the Salesforce Field Type for any fields you are unsure about and then click Next to have Salesforce load the data into a custom object type. Name the new custom object you just created GeoPostcodes, and use the same name for the fields Label and API Name.
Click Finish to complete the import process.
Importing Account Data
For this tutorial, you’ll import account data for a fictitious Brazil-based coffee company using Salesforce’s data import wizard.
Download the CSV file with the account data here, or download the entire GitHub repo with full code samples.
After you download the data, go back to your Salesforce dashboard, click the menu icon on the top left side, and click Sales Application to get the sales view, which gives you easy access to critical details needed for sales such as leads, campaigns, and accounts.
In the sales view, click on the Accounts tab and select Import in the top right section. You will be navigated to the Data Import Wizard. Select the Accounts and Contacts option on this screen and then select Add new records.
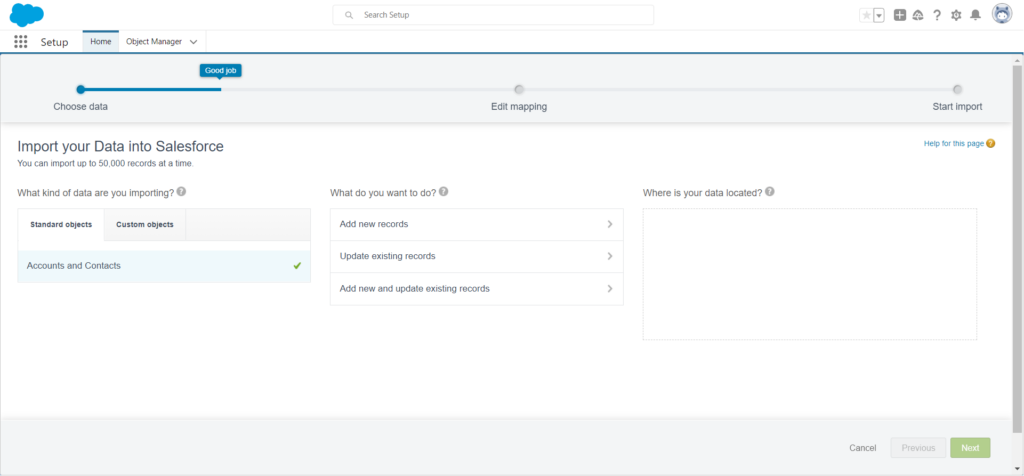
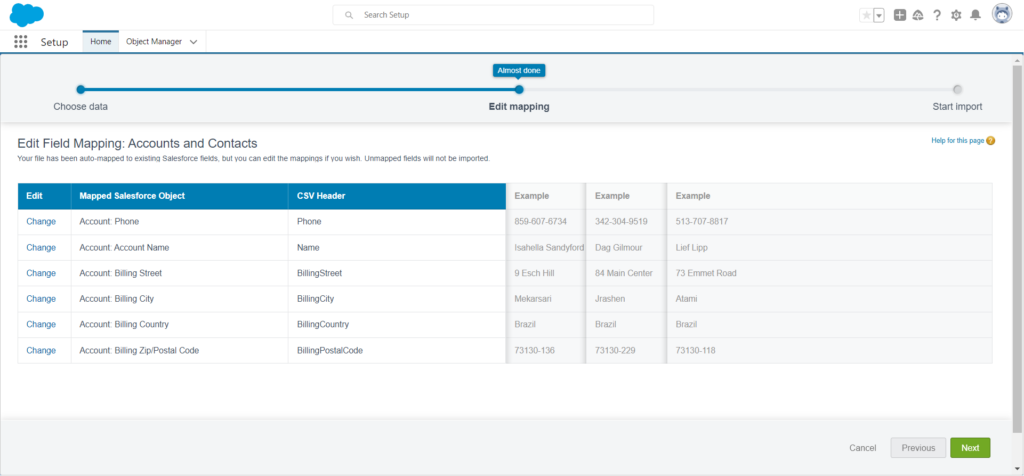
On the next screen, select and upload the CSV file with the account data you downloaded earlier. Then click Next, which will take you to a screen to verify field mapping. Salesforce might map Phone and Name to both the Account and Contact fields; if so, make sure to remove the mapping to the Contact field.
After you complete this process, click Next. This will take you to a screen to confirm the details of the import process. Click on Begin Import to start the process.
Once you’re done importing, return to the Accounts tab, where you’ll see all your newly imported accounts data.
Mapping GeoPostcodes Data to Account Information
Now that you’ve added both account and postal data to Salesforce, you can start mapping latitude and longitude data to accounts.
You’ll do this by creating a trigger that is fired every time an account is created or updated. A Salesforce trigger is a function that is called when a particular event occurs. For this tutorial, you’ll create a trigger that is fired whenever a record is created or updated. The trigger will map the geocoded zip code data from GeoPostcodes onto the account object, allowing you to use this data for customer segmentation or creating territory maps.
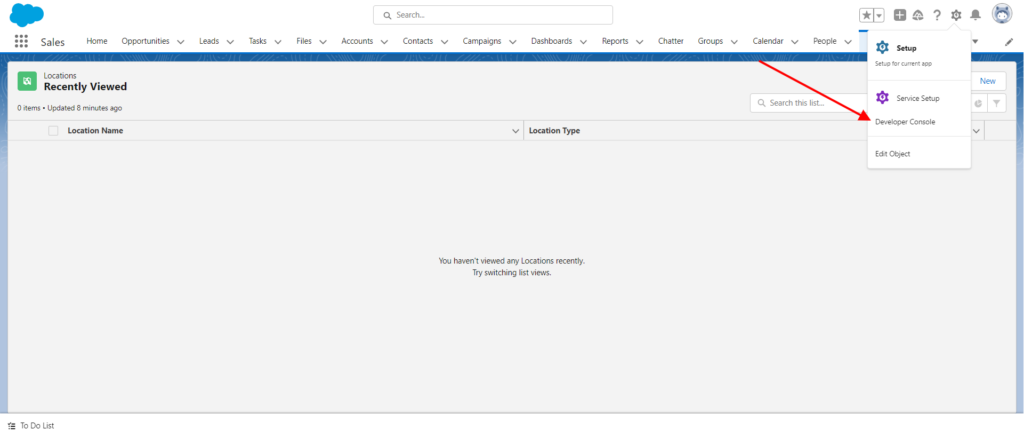
To create a trigger, click on the Settings icon in the top right corner of the Salesforce portal and select Developer Console.
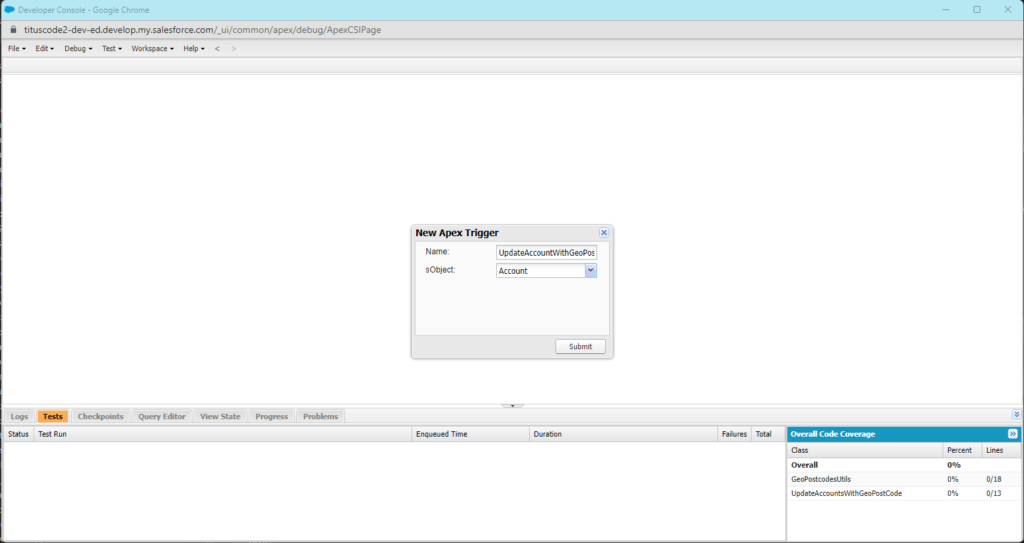
Click File and then New > Apex Trigger. Name the trigger “UpdateAccountWithGeoPostcodes” and use Accounts for the sObject field. An sObject in Salesforce is a fundamental data structure that represents a database table. It’s used to hold standard objects such as account and contact as well as custom objects
Now paste the following code for the trigger in the file you just created:
trigger UpdateAccountsWithGeoPostCode on Account (before insert, before update) {
    // collect all postcodes into a set
    Set<String> billingPostCodes = new Set<String>();
    for (Account acc : Trigger.new) {
        billingPostCodes.add(acc.BillingPostalCode);
    }

    // Query the GeoPostcodes custom object for matching records
    List<GeoPostcodes__c> matchingGeoPostcodes = [
        SELECT postcode__c, latitude__c, longitude__c
        FROM GeoPostcodes__c
        WHERE postcode__c IN :billingPostCodes
    ];

    // Build a map of BillingPostCode to GeoPostcodes record
    Map<String, GeoPostcodes__c> geoPostcodesByBillingPostCode = new Map<String, GeoPostcodes__c>();
    for (GeoPostcodes__c geo : matchingGeoPostcodes) {
        geoPostcodesByBillingPostCode.put(geo.postcode__c, geo);
    }

    // Update the account records with the geo data
    for (Account acc : Trigger.new) {
        GeoPostcodes__c geo = geoPostcodesByBillingPostCode.get(acc.BillingPostalCode);
        if (geo != null) {
            acc.BillingLatitude = geo.latitude__c;
            acc.BillingLongitude = geo.longitude__c;
        }
    }
}
The code above triggers before all insert and update operations on account objects. This means that the code is invoked before the account record is saved to the database, allowing you to perform additional operations or modify it before it’s saved. In this scenario, the trigger collects all billing postcodes and searches for them in the GeoPostcodes sObject table and updates all accounts objects with the relevant latitude and longitude values.
This trigger will work on any new or updated values. To run it on all accounts currently in your Salesforce account, you have to run a modified version of the code in the developer console targeting all accounts.
To do this, go to the Debug tab in the developer console and select Open Execute Anonymous Window. This window allows you to run any code on your Salesforce account. To update all accounts, you need to alter the code above to first do a SOQL (Salesforce Object Query Language) query to get all accounts, then run the code to update account information.
Paste the following code in the anonymous window and click Execute to run the code:
    // get all accounts
    List<Account> accountsToUpdate = [SELECT Id, BillingPostalCode FROM Account];
    Set<String> billingPostCodes = new Set<String>();
    for (Account acc : accountsToUpdate) {
        billingPostCodes.add(acc.BillingPostalCode);
    }

    // Query the GeoPostcodes custom object for matching records
    List<GeoPostcodes__c> matchingGeoPostcodes = [
        SELECT postcode__c, latitude__c, longitude__c
        FROM GeoPostcodes__c
        WHERE postcode__c IN :billingPostCodes
    ];

    // Build a map of BillingPostCode to GeoPostcodes record
    Map<String, GeoPostcodes__c> geoPostcodesByBillingPostCode = new Map<String, GeoPostcodes__c>();
    for (GeoPostcodes__c geo : matchingGeoPostcodes) {
        geoPostcodesByBillingPostCode.put(geo.postcode__c, geo);
    }

    // Update the account records with the geo data
    for (Account acc : accountsToUpdate) {
        GeoPostcodes__c geo = geoPostcodesByBillingPostCode.get(acc.BillingPostalCode);
        if (geo != null) {
            acc.BillingLatitude = geo.latitude__c;
            acc.BillingLongitude = geo.longitude__c;
        }
    }
    // lastly call the update function to update all records
    update accountsToUpdate;
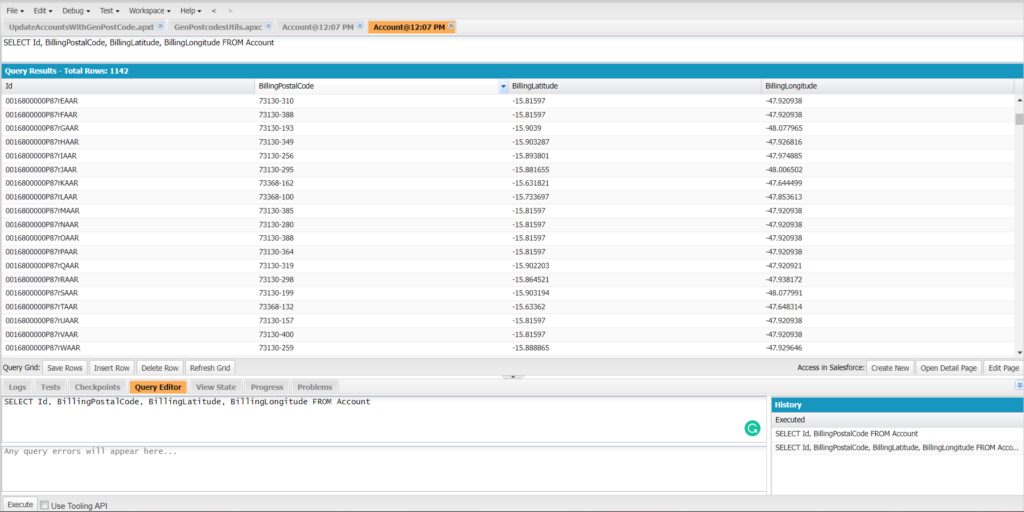
To test that the geocoded data was added, you can run a SOQL query on the Accounts table. To do this, go to the bottom of the developer console and navigate to Query Editor. Paste the following query and hit Execute:
SELECT Id, BillingPostalCode, BillingLatitude, BillingLongitude
FROM Account
You should get back a list of all accounts and their postal and geocoded data.
Filtering and Segmenting Account Data
Now that the account objects include geocoded zip codes, you can filter and segment customers using their geolocation to enhance your marketing and sales.
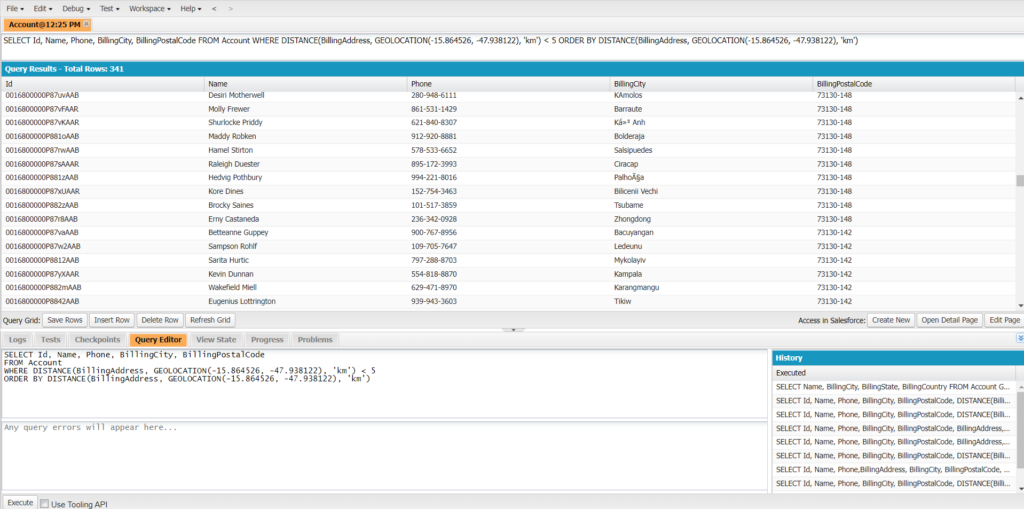
As mentioned before, having accurate geocoded data for your accounts allows you to filter customers by their distance to a particular coordinate. For example, our fictive coffee company might have just launched a new coffee brand and wants to boost demand. It wants to run a campaign that offers free deliveries for all customers within a five-kilometer radius of the distribution center.
You can run a location-based targeted campaign by using the distribution center’s coordinates (-15.864526 latitude and -47.938122 longitude for our example) and the geocoded data you uploaded to filter customer accounts by their proximity to the distribution center. To do this, you’d run the following SOQL query in the developer console:
SELECT Id, Name, Phone, BillingCity, BillingPostalCode
FROM Account
WHERE DISTANCE(BillingAddress, GEOLOCATION(-15.864526, -47.938122), 'km') < 5
ORDER BY DISTANCE(BillingAddress, GEOLOCATION(-15.864526, -47.938122), 'km')
The query above returns all accounts within five kilometers of the company’s distribution center (GEOLOCATION(-15.864526, -47.938122)). It also orders them by distance in ascending order. The query should produce the following output:
Conclusion
In this tutorial, you learned how to integrate geocoded zip code data from GeoPostcodes into Salesforce. You also went through an example of how you could use this data to segment customers.
You could use this data for much more, like building sales territories, gathering stats on mileage tracking, sales, and routing, planning routes for deliveries or sales, or improving your address data to set up correct SLAs and improve shipping and direct mail. You could even use it to map your contacts to their time zone to improve communication.
Request GeoPostcodes’ free 30-day trial, and adapt this tutorial to test your location data needs.
FAQ
How can I use ZIP codes to improve sales performance in Salesforce?
In Salesforce, ZIP codes help define sales territories, ensuring reps focus on the right business opportunities.
You can use a custom object or a formula field to automatically assign accounts based on ZIP code data.
Why am I getting an error when creating new records with ZIP codes?
If you receive an error when adding new records, check that the Salesforce ZIP code field is correctly mapped.
Use SELECT Id queries to validate account data and ensure proper formula field configurations.