
To calculate the distance between postal codes, use Python to match each postal code to latitude and longitude coordinates from GeoPostcodes, then compute straight-line distance using geodesic methods such as GeoPy or region-specific projections with PyProj.
Key Takeaways
- Postal code distance is calculated by first matching each postal code to latitude and longitude coordinates, using data sources such as GeoPostcodes’ standardized postcode files.
- In Python, libraries like GeoPy calculate accurate geodesic (“as-the-crow-flies”) distances, while PyProj enables region-specific distance calculations using local map projections.
- Geodesic methods work best for cross-country/ or global distances, while local projections are more accurate within a single country/ or region.
- Distances calculated in this article are straight-line distances, not driving or routing distances.
- Accurate, up-to-date postal code coordinate data is essential, which is why the article relies on GeoPostcodes’ regularly updated worldwide datasets, with Nominatim used only as a fallback.
Introduction
Have you ever wondered how far apart two zip codes are? Knowing the distance between two zip codes can be very useful whether ordering something online or analyzing data. But how can you calculate it quickly and accurately?
In this article, we will explain the basics of zip codes and geospatial data, introduce some Python libraries that can help you with distance calculation, and guide you through a step-by-step example of how to use a zip code distance formula. By the end of this article, you will be able to use Python code to calculate the distance between two points like a pro.
To follow this tutorial, you will need a computer with a Python development environment; I use Spyder, which comes with the Anaconda Python distribution, but other editors like JupyterLab will also work (use the following script). You will also need the provided zip code sample CSVs downloaded to your computer. Check our portal to download free samples.
💡 For over 15 years, we have created the most comprehensive worldwide zip code database. Our location data is updated weekly, relying on more than 1,500 sources. Browse GeoPostcodes datasets and download a free sample here.
The data you’ll need
Before beginning, make sure to download Zip Code CSV Files containing zip/postal codes along with their latitude and longitude:
- Required columns:
postcode,latitude,longitude
- Download free samples from GeoPostcodes portal
Understanding Zip/Post Codes and Geospatial Data
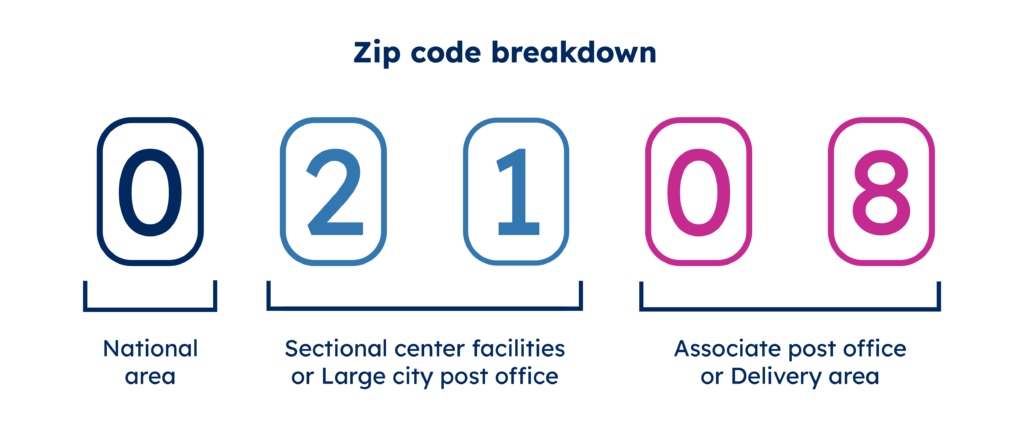
Zip codes in the United States and postcodes worldwide are alphanumeric systems employed by postal services to enhance mail sorting and delivery efficiency. In the U.S., zip codes, consisting of five digits, signify regions, sectional center facilities, and specific post offices. Internationally, postcodes vary in format but share the purpose of facilitating effective mail distribution.
These codes are essential for geospatial data, providing geographic attributes crucial for various applications. By utilizing zip or postal codes and knowing the latitude and longitude of an address, we can perform calculations like the distance between two locations. However, it’s crucial to acknowledge their limitations and range of methods suited to different cases.
The Role of Zip Codes in Distance Calculation
Before using Python code to calculate the distance between two points or two zip codes, we need information about their geographic coordinates, specifically latitude (lat) and longitude (long).
- Latitude is the angle between the equator and a point on the earth’s surface, measured in degrees north or south.
- Longitude is the angle between the prime meridian and a point on the earth’s surface, measured in degrees east or west.
Together, latitude and longitude form a unique pair of numbers that can pinpoint any location on the globe.
Once we have the lat and long coordinates of two zip codes, we can use various methods to compute the distance between them.
It’s important to note that the distances calculated in this tutorial represent ‘as the crow flies’ measurements. This means we’re computing the shortest direct distance between two points on the Earth’s surface, not accounting for any physical barriers or specific travel routes.
Geospatial Data Sources for Zip Codes
There are many sources where we can obtain geospatial data for zip codes in the form of APIs and open-source boundary files, but the most straightforward are CSVs and pre-existing Python packages.
In my Python script, I’ll utilize GeoPostcodes‘ standardized postcode files for Great Britain and Mexico and Nominatim from the GeoPy package, allowing me to calculate zips not included in the CSV files.
Our GeoPostcodes postcode files have the advantage of being regularly updated to ensure accuracy and up-to-date data. Download a free sample on our website.
I’ve deliberately selected postcode data from two countries, Great Britain and Mexico, to showcase how various Python methods may excel in specific scenarios. Further elaboration on this topic will be provided in subsequent blog sections.
Using Python Libraries for Distance Calculation
Python is a powerful and versatile programming language with many libraries and modules for geospatial data and distance calculation. This section will introduce two of the most popular and useful ones: GeoPy and PyProj.
GeoPy emerges as a powerful tool in the realm of geospatial calculations. Leveraging sophisticated algorithms, GeoPy converts addresses or zip codes into accurate geographic coordinates. The library’s standout feature lies in its geodesic distance calculations, where it employs Vincenty formula in Python to calculate the shortest path between two sets of coordinates.
With user-friendly integration into Python scripts, GeoPy empowers users to effortlessly make precise and reliable distance measurements, making it a go-to solution for tasks that demand accuracy, such as supply chain and data analytics.
PyProj is a Python library specializing in coordinate projections and transformations. Particularly valuable when geographic coordinates need translation into projected space, PyProj supports a wide range of projections, allowing users to tailor their approach to specific regional contexts.
In our demonstration, PyProj allows us to use specific projections tailored to countries and regions (in my example, Great Britain and Mexico), showcasing its adaptability in diverse scenarios. This flexibility positions PyProj as a robust tool for users requiring nuanced control over coordinate systems, making it a strategic choice in geospatial applications.
While GeoPy and PyProj play integral roles in geospatial calculations, their strengths lie in distinct domains. GeoPy stands out for its accuracy in global geodesic calculations, ensuring accuracy across the Earth’s varied landscapes. On the other hand, PyProj’s forte lies in its ability to create and manipulate region-specific projections, offering users a calculation tailored to their region of interest.
In our upcoming demonstration, we will utilize both libraries, combining GeoPy’s geodesic calculations with PyProj’s custom projections to showcase a comprehensive approach to distance measurement.
The two libraries showcase the Python tools for tackling diverse geospatial challenges, ensuring optimal accuracy and context-awareness in distance calculations.
We will now break down the different blocks of code that allow us to calculate the distance between two zip codes.
1. Reading CSV files with Python
Before diving into calculation methods, we must write code to read the coordinates associated with the zip codes from our CSV file. Let’s begin by importing the relevant packages and defining a function to read the CSV and store the information.
import csv  # For reading and writing CSV files


# Paths to CSV files on your local machine

csv_file_1 = r"C:\PATH\TO\CSV1"

csv_fileh_2 = r"C:\PATH\TO\CSV2"


# Open CSV and store lat and lon associated to the zips in the file for a first CSV

with open(csv_file_1, 'r', encoding='utf-8') as file_1:

    reader_1 = csv.DictReader(file_1, delimiter=';')

    for row_1 in reader_1:

        zip_code_1 = row_1['postcode']

        latitude_1 = float(row_1['latitude'])

        longitude_1 = float(row_1['longitude'])

        coordinates_dict[zip_code_1] = (longitude_1, latitude_1)


with open(csv_file_2, 'r', encoding='utf-8') as file_2:

    reader_2 = csv.DictReader(file_2, delimiter=';')

    for row_2 in reader_2:

        zip_code_2 = row_2['postcode']

        latitude_2 = float(row_2['latitude'])

        longitude_2 = float(row_2['longitude'])

        coordinates_dict[zip_code_2] = (longitude_2, latitude_2)


# Enter the zip codes you want to calculate the distance between

zip_code1 = 'ZIP1'

zip_code2 = 'ZIP2'


# Retrieve coordinates for the specified zip codes

coord1 = coordinates_dict.get(zip_code1)

coord2 = coordinates_dict.get(zip_code2)
We can easily adapt the function to read coordinates from various locations on our local machine by providing the path to the desired CSV file as an argument. Note that the row variables to read the CSV are tailored to the GeoPostcodes CSV file structure, but this may need to be altered to correspond to different file structures.
This is simple to do, and the names of the columns used in the example above should be altered to match the dataset you are using.
The function reads zip codes and coordinates, generating a dictionary that links each zip code to its corresponding latitude and longitude. After executing the functions for each CSV file, the resulting dictionaries are merged into a comprehensive `coordinates_dict`, facilitating seamless distance calculations between them.
2. Nominatim
The geopy.geocoders.nominatim class is a part of the Geopy library and Geocodes from popular open source data OpenStreetMap (OSM). This package converts addresses or place names into latitude and longitude for areas of the globe where OSM has good coverage.
We will need to import the relevant package in our script to use this. To use GeoPy, we need to install it using pip or conda (pip install geopy; in your command line), and we then import them in our script as shown below:
from geopy.geocoders import Nominatim
The next step is to define a function to get coordinates from an input:
def get_coordinates_from_nominatim(postal_code):
geolocator = Nominatim(user_agent="your_app_name")

    location = geolocator.geocode(postal_code)

    if location:

        return location.longitude, location.latitude

    else:

        print(f"Coordinates not found for postal code: {postal_code}")

        return None
We can then add some code after the coord2 = coordinates_dict.get(zip_code2) line so that if the postcode is not found in your local CSV files (we will merge all of this into a single code block at the end of the article), it will attempt to retrieve the lat lon from OSM using nominatim:
if coord1 is None:

    if zip_code1 in coordinates_dict:

        coord1 = coordinates_dict[zip_code1]

    else:

        coord1 = get_coordinates_from_nominatim(zip_code1)

        if coord1:

            coordinates_dict[zip_code1] = coord1


if coord2 is None:

    if zip_code2 in coordinates_dict:

        coord2 = coordinates_dict[zip_code2]

    else:

        coord2 = get_coordinates_from_nominatim(zip_code2)

        if coord2:

            coordinates_dict[zip_code2] = coord2
Note that when using the Nominatim to fetch data, it is important to include the name of the country/ in the zip_code1 and 2 input (e.g. ‘75011, France’ for the 11th arrondissement in Paris ) as zip codes are reused across different countries.
For those interested in further details, the reference link to Nominatime in the GeoPy library can be found here.
3. GeoPy
GeoPy is a Python library that provides geocoding and distance measurement services. Geocoding converts addresses or zip codes into geographic coordinates, such as lat and long. Distance measurement calculates the distance between two or more locations using various formulas and methods.
As we downloaded the GeoPy library in the Nominatim section above, we can import further relevant packages in our Python code as shown in the code block below:
from geopy.distance import geodesic # For geodesic distance calculations
The next step is to define a function to calculate the distance between the two zip codes using GeoPy:
def calculate_distance_geopy(coord1, coord2):    distance_miles = geodesic(coord1, coord2).miles
distance_km = geodesic(coord1, coord2).kilometers

    return distance_miles, distance_km
GeoPy takes parameters representing lat and long for both coordinate sets. Upon execution, it returns the distance between the two zip codes in miles and kilometers (km), taking into account the Earth’s spherical shape. It utilizes the Vincenty formula in Python, which accounts for Earth’s flattening and curvature, and spherical trigonometry’s incorporation to accurately determine the shortest path between two points. This method is particularly good at providing precise results, especially when dealing with long distances and global measurements. It effectively solves the inverse problem of geodesy, pinpointing the shortest path between coordinates.
For those interested in further details, the reference link to the Vincenty formula in Python and geodesic calculations in the GeoPy library can be found here.
4. PyProj
PyProj is a Python library that offers functionality for different coordinate projections. Coordinate projections involve converting geographic coordinates into projected space tailored to specific countries or regions of the globe. Like Geopy, PyProj provides a versatile toolset for handling spatial data with precision.
We are going to need to use the following package (if not installed, execute pip install pyproj; in your console):
from pyproj import Proj # For coordinate projections
Now, let’s define a function to calculate distances between two sets of coordinates using a country\/-specified projection with PyProj:
def calculate_distance_projection(coord1, coord2, projection):

    # Convert coordinates to projected space using the specified projection

    lon1, lat1 = coord1

    lon2, lat2 = coord2

    x1, y1 = projection(lon1, lat1)

    x2, y2 = projection(lon2, lat2)

# Calculate distance in meters and convert to miles and kilometers

    distance_meters = ((x2 - x1)  2 + (y2 - y1)  2) ** 0.5

    distance_km = distance_meters / 1000

    distance_miles = distance_km / 1.60934  # Conversion factor

    return distance_miles, distance_km
This function accepts lat and long coordinates and a projection function, returning distances in both miles and kilometers. It caters to the specific needs of coordinate projections, making it a valuable addition to your exploration of distance calculation methods in Python. For more in-depth information on PyProj and coordinate projections, refer to the official documentation.
5. Plotting the results
To visualize our results, let’s create a function for plotting the results. This function will create the map, plot the distances, and display relevant information for our different methods. Here’s the modified code (if not installed, execute pip install cartopy; in your console):
import matplotlib.pyplot as plt

import cartopy.crs as ccrs

import cartopy.feature as cfeature

from cartopy.io import img_tiles
We are now going to code the function to call the functions to calculate the distances between the different methods as well as plot the results:
def plot_map(ax, coord1, coord2, zip_code1, zip_code2, distances):

    osm_tiles = img_tiles.OSM()

    ax.add_image(osm_tiles, 8)  # Adjust the zoom level (here, 8) as needed

    ax.set_extent([coord1[0] - 1, coord2[0] + 1, coord1[1] - 1, coord2[1] + 1])

    ax.add_feature(cfeature.COASTLINE, edgecolor='#01295F', linewidth=0.75)

    ax.plot([coord1[0], coord2[0]], [coord1[1], coord2[1]], 'k-', linewidth=0.75)

    point1 = ax.plot(coord1[0], coord1[1], 'o', color='#e63946', markersize=3, label=f'{zip_code1}')

    point2 = ax.plot(coord2[0], coord2[1], 'o', color='#00a77d', markersize=3, label=f'{zip_code2}')

    ax.set_title(f'Distance between {zip_code1} and {zip_code2}')

    return point1, point2


fig, ax = plt.subplots(subplot_kw={'projection': ccrs.PlateCarree()}, dpi=900)


if zip_code1 in coordinates_dict and zip_code2 in coordinates_dict:

    coord1 = coordinates_dict[zip_code1]

    coord2 = coordinates_dict[zip_code2]


    distance_geopy = calculate_distance_geopy(coord1[::-1], coord2[::-1])

    distance_geopy_miles, distance_geopy_km = distance_geopy


    projection_1 = Proj('EPSG:27700')

    distance_projection_1 = calculate_distance_projection(coord1, coord2, projection_1)

    distance_projection_1_miles, distance_projection_1_km = distance_projection_1


    projection_2 = Proj('EPSG:6362')

    distance_projection_2 = calculate_distance_projection(coord1, coord2, projection_2)

    distance_projection_2_miles, distance_projection_2_km = distance_projection_2


    point1, point2 = plot_map(ax, coord1, coord2, zip_code1, zip_code2, None)


    # Set the title of the plot as the method name

    ax.set_title(f'Distance between {zip_code1} and {zip_code2}')


    # Add legend

    ax.legend()


    # Your existing code for legend_distances_text

    legend_distances_text = f'Distances\n\nGeopy (miles): {distance_geopy_miles:.2f}\nGeopy (km): {distance_geopy_km:.2f}\n\nProjection (GB) (miles): {distance_projection_1_miles:.2f}\nProjection (GB) (km): {distance_projection_1_km:.2f}\n\nProjection (MX) (miles): {distance_projection_2_miles:.2f}\nProjection (MX) (km): {distance_projection_2_km:.2f}'


    fig.text(1.1, 0.5, legend_distances_text, transform=ax.transAxes, fontsize='small', va='center', ha='left', bbox=dict(facecolor='white', alpha=0.8, edgecolor='black', boxstyle='round,pad=0.3'))


plt.tight_layout()

plt.show()
Note that this is also where you specify the projection systems you want to use for the PyProj method in the lines projection_1 = Proj(‘EPSG:27700’) and the same for projection_2. For my case, I have used the projection for Great Britain (EPSG:27700) and Mexico (EPSG:6362). You can find projection systems best suited to your region on the following PDF where the WKID fits into the Proj line as such: Proj(‘EPSG:WKID’).
Also, note that I am using an Open Street Map (OSM) base map for aesthetic purposes; it greatly increases the time of computation for the plot, especially for longer distances; comment on these lines for faster computation of the plot.
This script block accepts the necessary data and displays the distances on a map with points, lines, and informative legends. I have tailored this part of the script to return a plot that I find clear and aesthetically pleasing, but all the parameters can be altered to your liking. For more in-depth information on Matplotlib and Cartopy, refer to the official documentation.
6. Comparing Distance Calculation Methods: A Comprehensive Script
Now that we’ve explored various methods for calculating distances between zip codes using Python let’s combine these methods into a comprehensive script. In this example, the script allows us to compare the results for different distance calculation techniques for various zip codes from Great Britain and Mexico.
Integrating into a single script
Let’s take a closer look at how we can bring all these components we have discussed into a single script:
# -*- coding: utf-8 -*-


import csv

from geopy.distance import geodesic

from geopy.geocoders import Nominatim

from pyproj import Proj

import matplotlib.pyplot as plt

import cartopy.crs as ccrs

import cartopy.feature as cfeature


def calculate_distance_geopy(coord1, coord2):

    distance_miles = geodesic(coord1, coord2).miles

    distance_km = geodesic(coord1, coord2).kilometers

    return distance_miles, distance_km


def calculate_distance_projection(coord1, coord2, projection):

    lon1, lat1 = coord1

    lon2, lat2 = coord2

    x1, y1 = projection(lon1, lat1)

    x2, y2 = projection(lon2, lat2)

    distance_meters = ((x2 - x1)  2 + (y2 - y1)  2) ** 0.5

    distance_km = distance_meters / 1000

    distance_miles = distance_km / 1.60934

    return distance_miles, distance_km


def get_coordinates_from_nominatim(postal_code):

    geolocator = Nominatim(user_agent="your_app_name")

    location = geolocator.geocode(postal_code)

    if location:

        return location.longitude, location.latitude

    else:

        print(f"Coordinates not found for postal code: {postal_code}")

        return None


csv_file_1 = r"C:\Users\Colin\Desktop\blog\zip_code_distance\GPC-POST-GEO-NORM-GB_CSV\GPC-POSTCODES-GEO-NORM-GB.csv"

csv_file_2 = r"C:\Users\Colin\Desktop\blog\zip_code_distance\GPC-POST-GEO-NORM-MX_CSV\GPC-POSTCODES-GEO-NORM-MX.csv"


coordinates_dict = {}


with open(csv_file_1, 'r', encoding='utf-8') as file_1:

    reader_1 = csv.DictReader(file_1, delimiter=';')

    for row_1 in reader_1:

        zip_code_1 = row_1['postcode']

        latitude_1 = float(row_1['latitude'])

        longitude_1 = float(row_1['longitude'])

        coordinates_dict[zip_code_1] = (longitude_1, latitude_1)


with open(csv_file_2, 'r', encoding='utf-8') as file_2:

    reader_2 = csv.DictReader(file_2, delimiter=';')

    for row_2 in reader_2:

        zip_code_2 = row_2['postcode']

        latitude_2 = float(row_2['latitude'])

        longitude_2 = float(row_2['longitude'])

        coordinates_dict[zip_code_2] = (longitude_2, latitude_2)


zip_code1 = 'ZIP1'

zip_code2 = 'ZIP2'


coord1 = coordinates_dict.get(zip_code1)

coord2 = coordinates_dict.get(zip_code2)


if coord1 is None:

    if zip_code1 in coordinates_dict:

        coord1 = coordinates_dict[zip_code1]

    else:

        coord1 = get_coordinates_from_nominatim(zip_code1)

        if coord1:

            coordinates_dict[zip_code1] = coord1


if coord2 is None:

    if zip_code2 in coordinates_dict:

        coord2 = coordinates_dict[zip_code2]

    else:

        coord2 = get_coordinates_from_nominatim(zip_code2)

        if coord2:

            coordinates_dict[zip_code2] = coord2


def plot_map(ax, coord1, coord2, zip_code1, zip_code2, distances):

    ax.add_feature(cfeature.COASTLINE, edgecolor='#01295F', linewidth=0.75)

    ax.plot([coord1[0], coord2[0]], [coord1[1], coord2[1]], 'k-', linewidth=0.75)

    point1 = ax.plot(coord1[0], coord1[1], 'o', color='#e63946', markersize=3, label=f'{zip_code1}')

    point2 = ax.plot(coord2[0], coord2[1], 'o', color='#00a77d', markersize=3, label=f'{zip_code2}')

    ax.set_title(f'Distance between {zip_code1} and {zip_code2}')

    return point1, point2


fig, ax = plt.subplots(subplot_kw={'projection': ccrs.PlateCarree()}, dpi=900)


if zip_code1 in coordinates_dict and zip_code2 in coordinates_dict:

    coord1 = coordinates_dict[zip_code1]

    coord2 = coordinates_dict[zip_code2]


    distance_geopy = calculate_distance_geopy(coord1[::-1], coord2[::-1])

    distance_geopy_miles, distance_geopy_km = distance_geopy


    projection_1 = Proj('EPSG:27700')

    distance_projection_1 = calculate_distance_projection(coord1, coord2, projection_1)

    distance_projection_1_miles, distance_projection_1_km = distance_projection_1


    projection_2 = Proj('EPSG:6362')

    distance_projection_2 = calculate_distance_projection(coord1, coord2, projection_2)

    distance_projection_2_miles, distance_projection_2_km = distance_projection_2


    point1, point2 = plot_map(ax, coord1, coord2, zip_code1, zip_code2, None)


    # Set the title of the plot as the method name

    ax.set_title(f'Distance between {zip_code1} and {zip_code2}')


    # Add legend

    ax.legend()


    # Your existing code for legend_distances_text

    legend_distances_text = f'Distances\n\nGeopy (miles): {distance_geopy_miles:.2f}\nGeopy (km): {distance_geopy_km:.2f}\n\nProjection (GB) (miles): {distance_projection_1_miles:.2f}\nProjection (GB) (km): {distance_projection_1_km:.2f}\n\nProjection (MX) (miles): {distance_projection_2_miles:.2f}\nProjection (MX) (km): {distance_projection_2_km:.2f}'


    fig.text(1.1, 0.5, legend_distances_text, transform=ax.transAxes, fontsize='small', va='center', ha='left', bbox=dict(facecolor='white', alpha=0.8, edgecolor='black', boxstyle='round,pad=0.3'))


plt.tight_layout()

plt.show()
By running this script, you’ll obtain not only the distances but also a visual representation of the geographical locations and the variations between different calculation methods. Note that in this example the PyProj is calculated for a Great Britain and Mexico projection, you may want to alter this to suit your case.
Comparing methods
This section delves into the script’s results, examining the distances obtained using GeoPy’s geodesic calculations and PyProj’s custom projections for both Great Britain and Mexico. This comparative analysis will provide insights into when each method excels and how it performs in different geographic contexts.
Orthodromy, a basic method for calculating geographical distances, employs a straightforward formula to determine the direct path between two points on the Earth’s surface. In this method, the distance (kilometers) between two locations, denoted as A and B, is computed using the equation.
Distance(A, B) = 6371 ACos(Cos(LatA) Cos(LatB) Cos(LngB - LngA) + Sin(LatA) Sin(LatB)).
This method involves basic trigonometric calculations and requires latitude and longitude inputs in radians. While orthodromy is an introductory approach to distance measurement, its simplicity and lack of sophistication may limit its suitability for tasks demanding greater precision or advanced geodetic considerations.
While many online resources often focus on the haversine method for calculating distances, this article takes a different approach. Recognizing the wealth of information already available on the haversine method, we aim to explore other efficient and innovative Python-based techniques.
This exploration allows us to provide fresh insights and alternative methods, broadening the scope of tools available to our readers for calculating distances between zip codes.
Let’s begin by comparing the distance between two Great Britain postcodes. Feel free to download samples for other countries from the GeoPostcode portal. Note that if the zips you want to use are not in the files your code is fetching from, it will attempt to find the data from OSM using Nominatim where more specifications (country/ name) may need to be used.
NE1 1AD in Newcastle and TR1 1UH in Truro. The Python script gives us the following results:
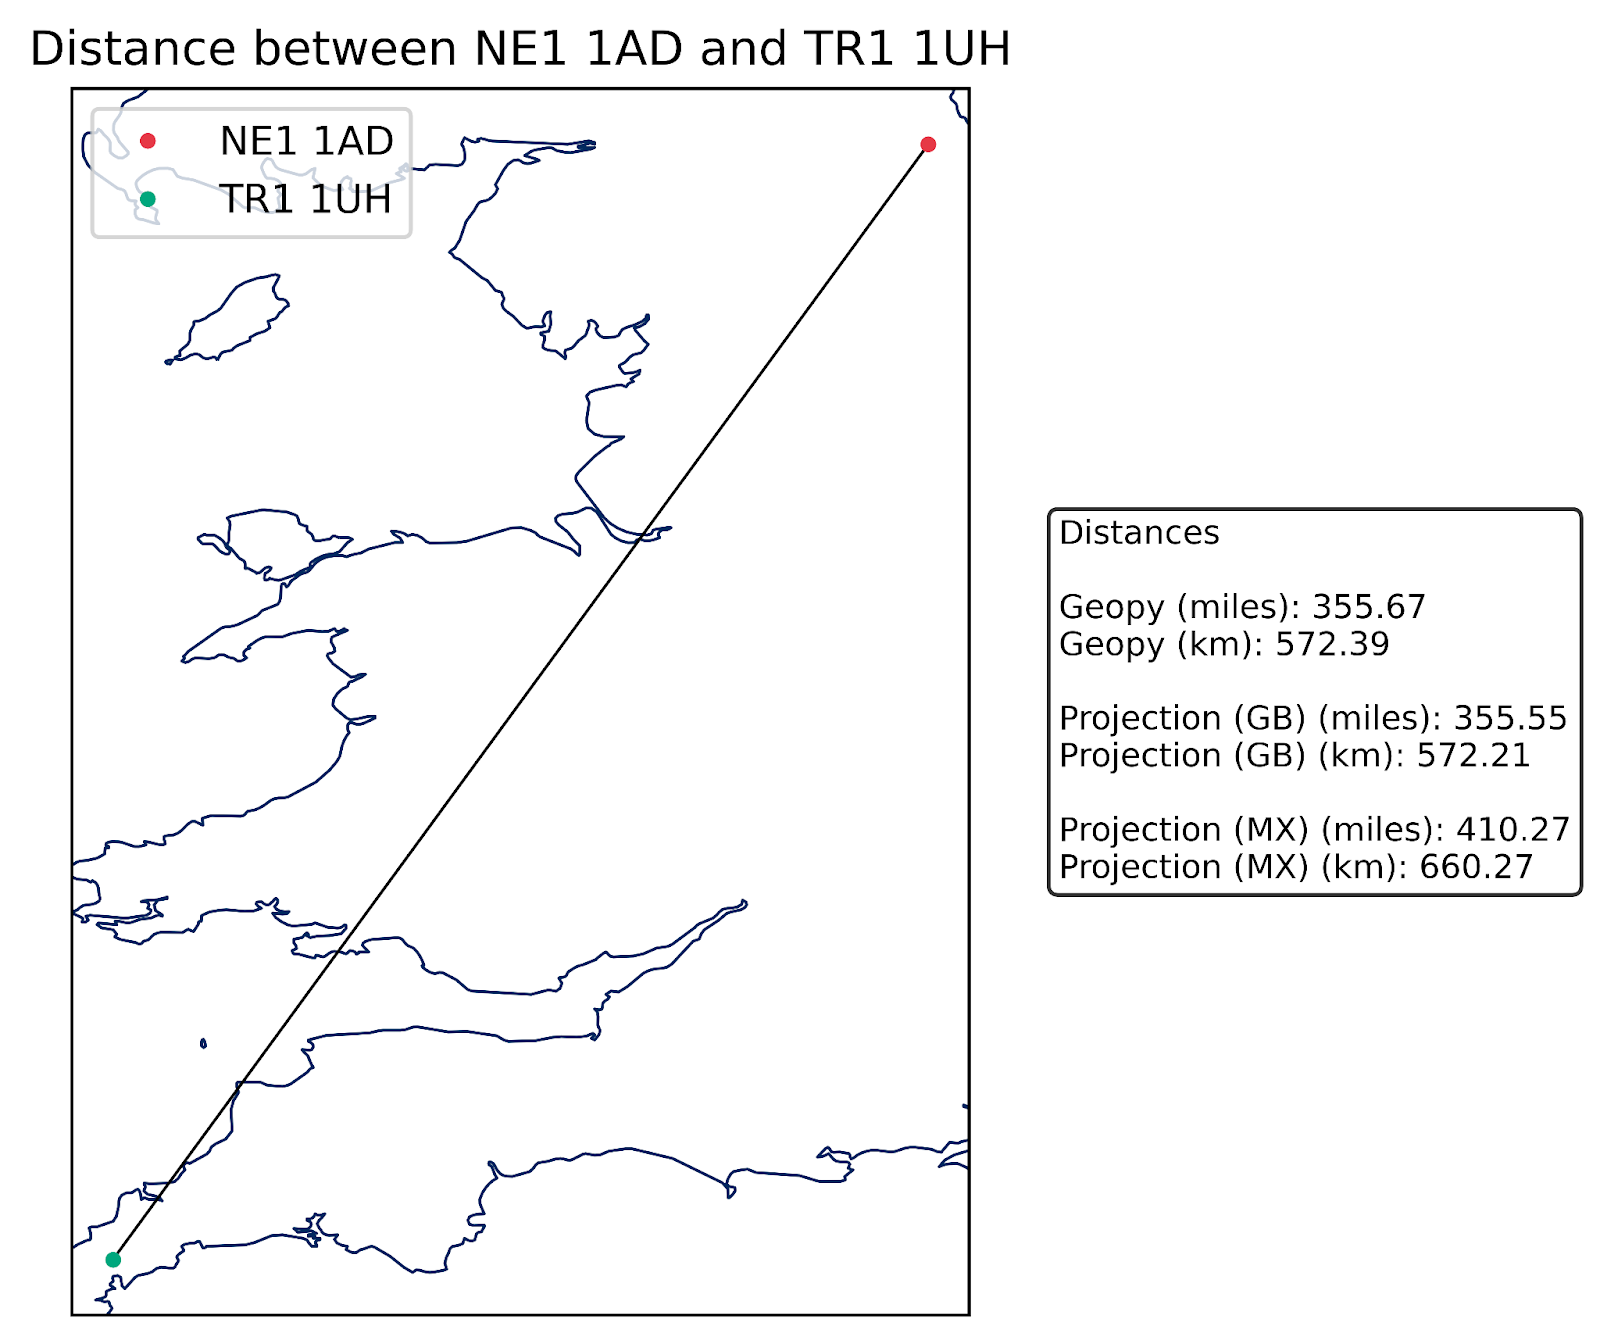
We observed a remarkable similarity between the Geopy and Projection (GB) results. The two methods yielded distances differing by only 0.12 miles, indicating consistent and reliable calculations by these two methods.
For this specific case, the slight superiority of the Projection (GB) method becomes apparent; the method employs a custom projection tailored specifically for Great Britain, optimizing the accuracy of distance calculations within the region. The example underscores the importance of selecting a method aligned with the specific geography of interest to ensure reliable outcomes.
However, the results take a noticeable turn when using Projection (MX), resulting in a distance measurement of 410.27 miles. This significant discrepancy can be attributed to the choice of a projection optimized for Mexico rather than Great Britain.
When employing a projection tailored for a different geographical region, especially one with distinct characteristics, the accuracy of distance calculations will be compromised.
In conclusion, the choice between Geopy and different projections hinges on the geographic context of the analysis. While Projection (GB) proves effective for distances within Great Britain, using Projection (MX) for these postcodes leads to less accurate results.
This example emphasizes the necessity of aligning the chosen method with the geographic scope of the analysis to ensure optimal accuracy and reliable outcomes.
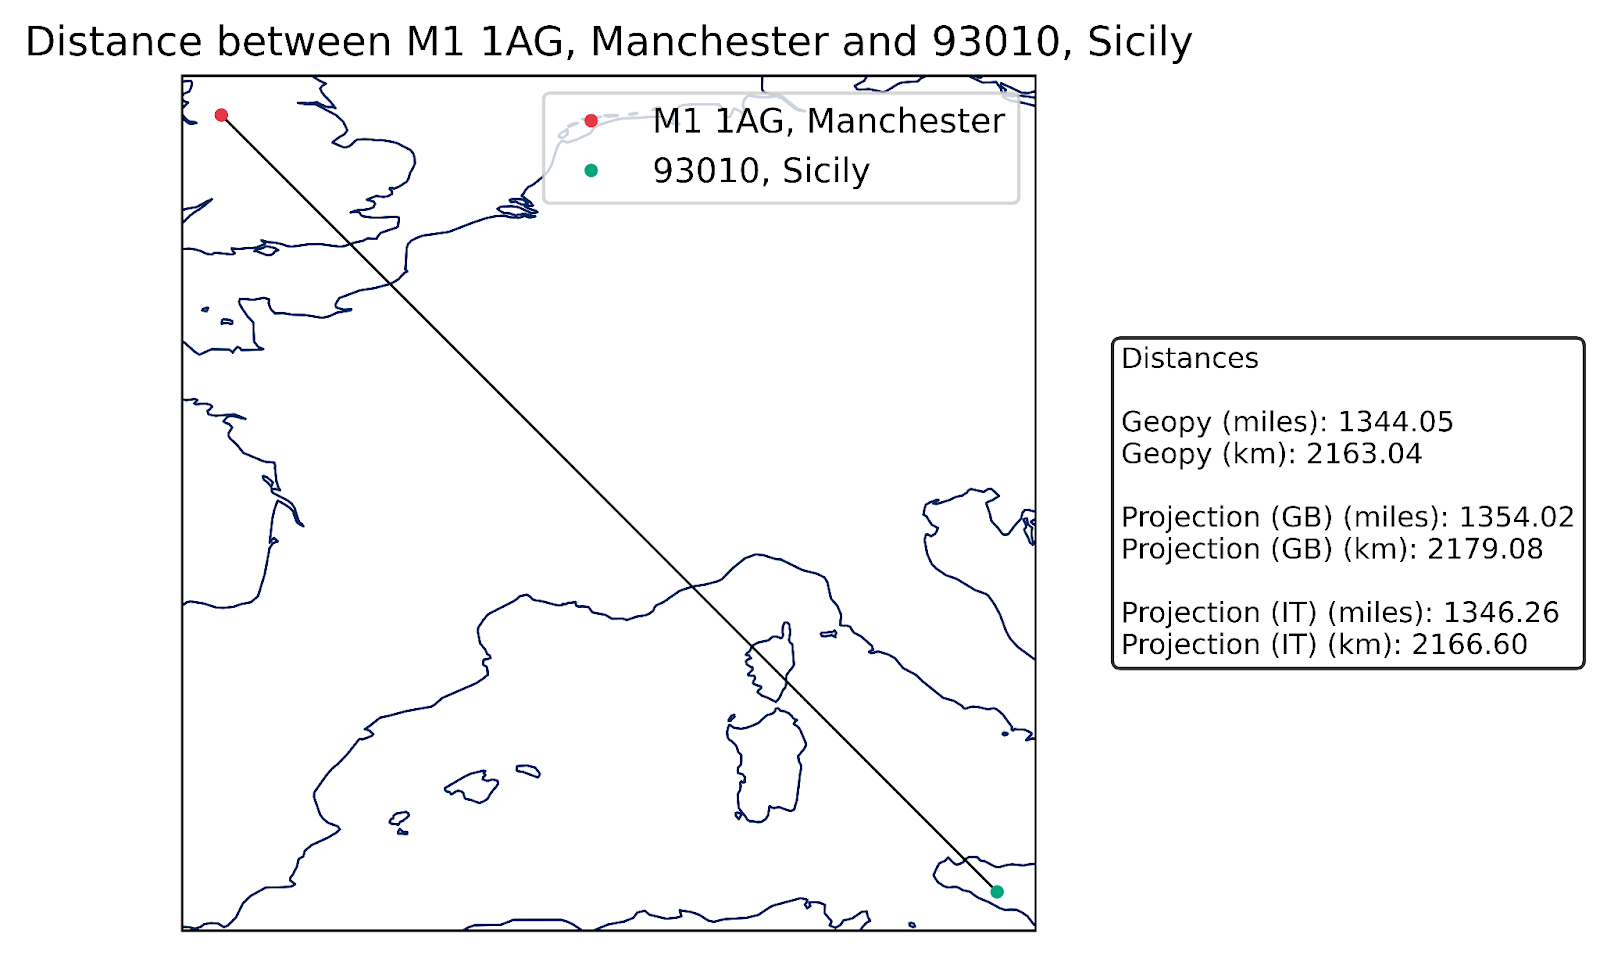
Now, let’s look at what happens if we take a postcode from Great Britain and one from Mexico. We will do the distance between E14 3PW in London and 01490 in Mexico City.
The Python script gives us the following results:
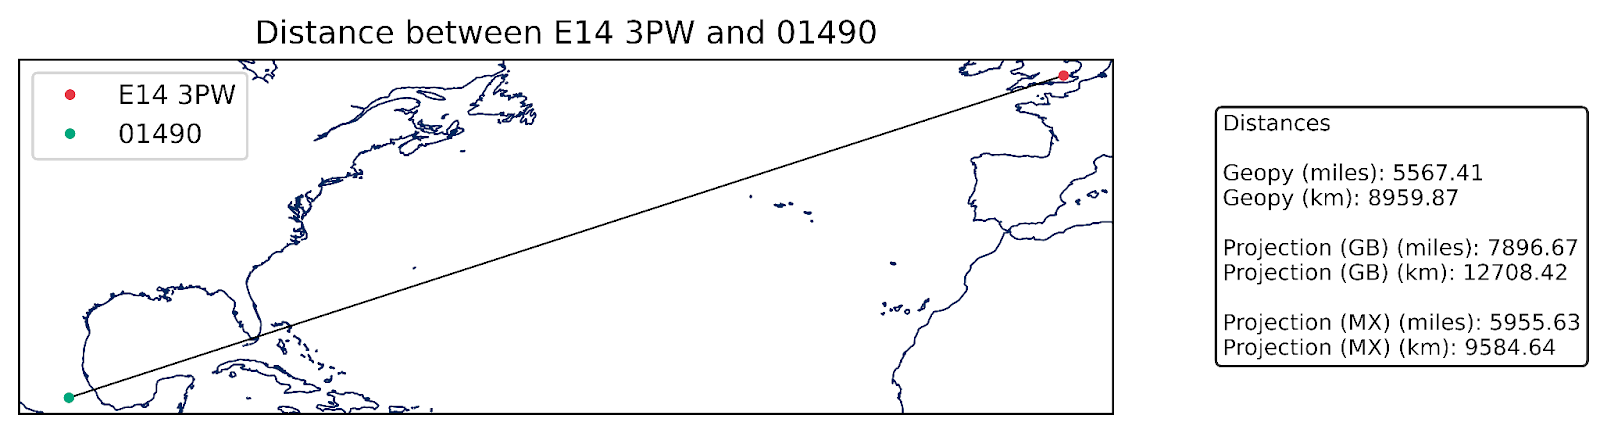
This comparison underscores a significant discrepancy in the results obtained using local projections. While Projection (GB) demonstrated accuracy within Great Britain in the previous example, its performance falters when applied to locations spanning different continents. The distance measured using both country\/-specific projections indicates substantial inaccuracies when dealing with an intercontinental distance calculation.
In contrast, Geopy delivers a more reliable result of 5567.41 miles for the same pair of coordinates. This outcome highlights the versatility and robustness of Geopy’s geodesic distance calculations on the ellipsoidal model of the Earth.
Operating independently of localized projections, Geopy is a more suitable choice for scenarios involving locations across diverse regions, showcasing its adaptability and accuracy in global comparisons.
In summary, when assessing distances between Great Britain and Mexico, both local projection methods, namely Projection (GB) and Projection (MX), demonstrate limitations when calculating distances between countries, leading to less accurate results compared to the geodesic calculations offered by Geopy.
This example underscores the critical consideration of geographic context and the necessity of choosing appropriate methods to ensure precise and reliable distance measurements, particularly when dealing with locations spanning different countries.
Bonus: Distance Between Zip Codes Excel
The formula used to calculate the distance between two geographical points is called orthodromy, as mentioned above.
This same formula can be used in Excel to calculate the distance between two zip codes:
Distance(A,B) = 6371 * ACos( Cos(LatA) * Cos(LatB) * Cos(LngB - LngA) + Sin(LatA) * Sin(LatB) )
- Convert the zip codes to latitude and longitude coordinates. Alternatively, use the GeoPostcodes database, which includes pre-geocoded zip codes.
- Once you have the coordinates for both zip codes, apply the orthodromy formula to calculate the distance.
- Latitude and longitude values must be input in radians: radians = degrees * PI/180.
The resulting number is the distance in kilometers between point A and point B. If you wish to return a result in miles (or any other unit), you must substitute the value 6371, which stands for the approximate radius of the Earth in km, by its equivalent in miles (or any other unit), that is, 3959 miles.
Conclusion
In this guide, we explored the art of calculating distances between zip codes using Python, a valuable skill for logistics planning, online shopping, and data analysis, to name a few.
We delved into the role of zip codes as a system for efficient mail delivery, recognizing their significance in geospatial data despite inherent limitations in representing geographic areas.
Leveraging Python libraries like Geopy and PyProj, we demonstrated how to read coordinates from CSV files and crafted a script for comparing distance calculation techniques. The script highlighted the synergy between Geopy and local projections for precise results within specific regions, emphasizing the critical role of geographic alignment.
In a global context, the limitations of local projections were exposed, showcasing GeoPy’s adaptability and precision. Our exploration underlines the importance of context-aware distance measurements and the need to select methods tailored to specific regions.
Python’s versatility and powerful libraries empower users to navigate geospatial complexities with finesse, ensuring accurate and reliable distance calculations across diverse scenarios.
Data sources are key to this process. GeoPostcodes maintains a worldwide database of zip codes allowing you to do distance calculations between locations anywhere in the world. Our files have the advantage of being regularly updated to ensure accuracy and up-to-date data.
Browse the data yourself, download a free sample, and reach out to us if you want to know more!
FAQ
What is a ZIP code distance calculator?
A ZIP code distance calculator estimates the distance between two postal codes using their geographic coordinates.
In practice, it converts ZIP codes into latitude and longitude values and measures the straight-line distance between them.
This approach supports large-scale analysis without relying on routing data.
How do you calculate the distance between ZIP codes in Python?
In Python, ZIP code distance is calculated by matching each ZIP code to latitude and longitude coordinates and applying a distance formula.
Libraries such as GeoPy compute geodesic distance, while PyProj supports region-specific projections.
GeoPostcodes provides standardized coordinate data to support these calculations.
What is the difference between ZIP code distance and ZIP code mileage?
ZIP code distance typically refers to straight-line distance between coordinates, while ZIP code mileage expresses that same distance in miles.
In other words, mileage is a unit choice, not a different calculation method.
Both rely on the same coordinate-based approach.
How accurate are distances calculated between ZIP codes?
ZIP code distances are approximate because they are based on centroid coordinates rather than exact addresses.
Accuracy depends on the quality and freshness of the underlying ZIP code data.
Using updated reference data from GeoPostcodes improves consistency and reliability.
Can ZIP code distance be calculated in miles or kilometers?
Yes, ZIP code distance can be calculated in either miles or kilometers.
The unit depends on the distance formula and Earth radius value used in the calculation.
GeoPy, for example, returns both miles and kilometers by default.
What is the best Python distance formula for ZIP codes?
The best Python distance formula depends on geographic scope.
GeoPy’s geodesic distance works best for global and cross-country/ calculations.
PyProj projections provide higher precision for distances within a specific country/ or region.
When should you use GeoPy instead of projection-based distance methods?
GeoPy should be used when calculating distances between ZIP codes across different countries or continents.
Projection-based methods are optimized for local regions and lose accuracy outside their intended area.
GeoPy avoids this limitation by using global geodesic calculations.
Where does ZIP code coordinate data come from?
ZIP code coordinate data comes from postal authorities, administrative sources, and curated geographic datasets.
GeoPostcodes aggregates more than 1,500 authoritative sources into standardized postcode files.
This ensures consistent coordinates across countries and updates over time.
How do organizations calculate ZIP code distances at scale?
Organizations calculate ZIP code distances at scale by combining centralized postcode databases with automated scripts.
Python libraries handle bulk distance calculations efficiently when paired with standardized reference data.
This approach scales beyond spreadsheets and manual methods.
How does GeoPostcodes compare to other worldwide postal code database providers?
Compared with providers such as GeoNames, OpenStreetMap, Google Maps Platform, HERE, TomTom, Melissa, and Smarty, GeoPostcodes is positioned as an enterprise reference data provider rather than a mapping, API, or crowdsourced data service.
Many alternatives focus on lookup, routing, or enrichment use cases, often relying on aggregated or community-maintained data that can vary in structure and update stability.
In contrast, GeoPostcodes emphasizes standardized postal code data, stable identifiers, and frequent updates designed to support long-term master data management, analytics, and operational consistency across countries.