
Key Takeaways
- Address validation in Salesforce improves logistics and prevents fraud by ensuring accurate data
- Google Maps integration in Salesforce may lack complete international validation
- Integration of GeoPostcodes enables comprehensive address validation
- GeoPostcodes enhances Salesforce via custom address object, data mapping, and improved operations
Introduction
Address validation is an important aspect of any customer relationship management (CRM) or sales system. Incorrect addresses can lead to delayed or lost shipments, frustrated customers, and increased costs. Address validation is even more critical when expanding to new countries or when you operate internationally since address formats and norms can differ significantly between countries.
In the broader context of master data management (MDM), integrating address validation processes into systems like Salesforce ensures data quality and consistency, which is essential for effective business operations.
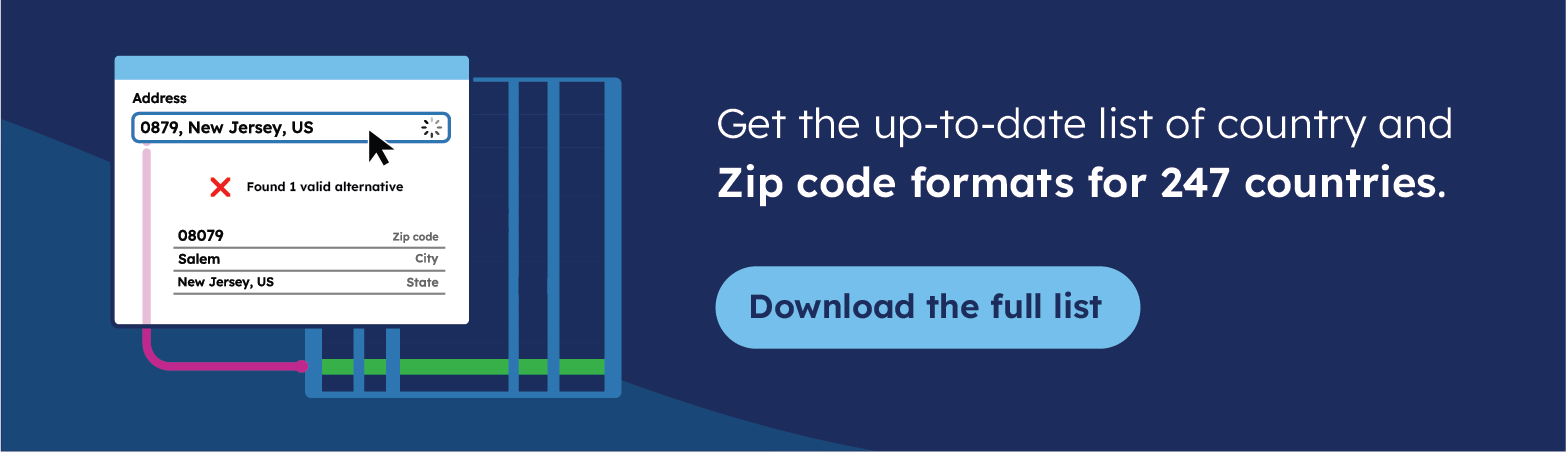
🌎 Want to eliminate international address validation errors? Access our enterprise postal zip code database with international address formats. Precise, accurate, and up-to-date. Browse GeoPostcodes database for free.
This article explores the benefits of address validation in Salesforce and shows you how to integrate GeoPostcodes data for address validation in Salesforce Sales Cloud to maintain high-quality data in your CRM.
The Benefits of Address Validation in Salesforce
Address validation in Salesforce ensures the accuracy of customer record data, which is integral to various business operations:
- Logistics operations: Accurate addresses are vital for quoting and delivering parcels correctly. Invalid data entry can lead to unsuccessful deliveries and increased operational costs.
- Customer service enhancement: Accurate addresses also improve customer satisfaction, not only because of more successful deliveries but also because accurate addresses give you time zone information that can help you schedule services appropriately.
- Territory mapping: Sales and marketing teams use geographical data for territory planning and segmentation. Correct addresses ensure efficient territory management.
- Fraud prevention: Accurate addresses help detect and prevent fraudulent activities, especially in e-commerce transactions. Fraudsters often use fake or incorrect addresses for online purchases to test whether stolen credit cards are active.
Address validation helps businesses avoid sending orders to the wrong place or fraudsters and prevents chargebacks.
Enabling Address Validation in Salesforce
Salesforce Sales Cloud offers an out-of-the-box integration with Google Maps. You can enable autocomplete on standard address fields using Google APIs.
However, this does not necessarily mean your addresses are validated or complete. Address autocomplete suggests address options as you type, and Google’s autocomplete helps you fill in an address faster when you type.
Yet, this doesn’t mean that the entered address is correct or that you captured sufficient information to send a package to that location.
Let’s illustrate it with an example. Suppose you work at a shipping company that uses Salesforce to manage sales orders. Your company must deliver a parcel from Mexico to Chicago in the USA.
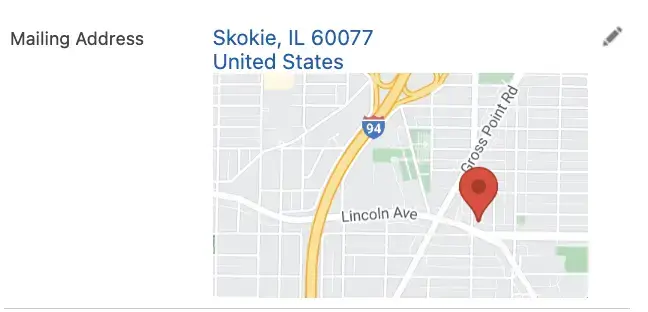
That means you’ll work with two contacts with validated addresses: one in Mexico and another in Chicago. When you add the address for the Chicago contact, Salesforce also shows you the Google Maps location:
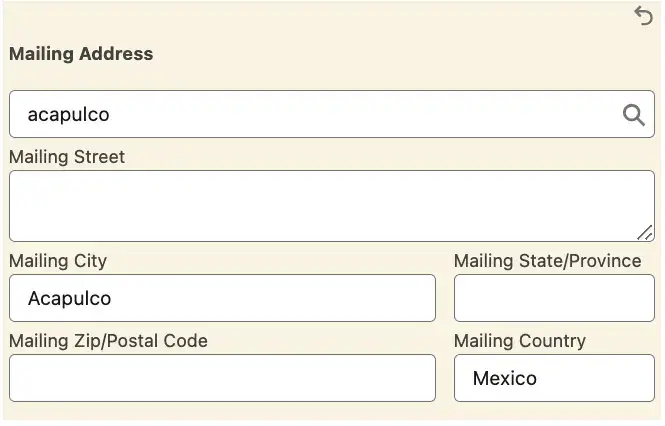
However, if you search for the address in Mexico where the package needs to be collected (in this case, Acapulco, with a postal code of 20393), you will notice that Google Maps cannot find the zip code, so no details get auto-populated:
The configuration of Google Maps with Salesforce also doesn’t provide information such as longitude and latitude to make sure that you have the correct location.
So although the data from Google Maps (or other validation services) is useful, it doesn’t give you access to a complete address database.
To validate your addresses against reliable and complete data—especially if you operate internationally—you need a complete address database.
Improving the Accuracy of Address Validation in Salesforce with GeoPostcodes
Let’s see how you can enhance address validation in Salesforce with external service data from GeoPostcodes. You’ll first get the data from GeoPostcodes and then configure Salesforce so that it can use this data.
To follow along with the next sections, you need a Salesforce Professional account and a GeoPostcodes account. Both offer free trials.
Get Data from GeoPostcodes
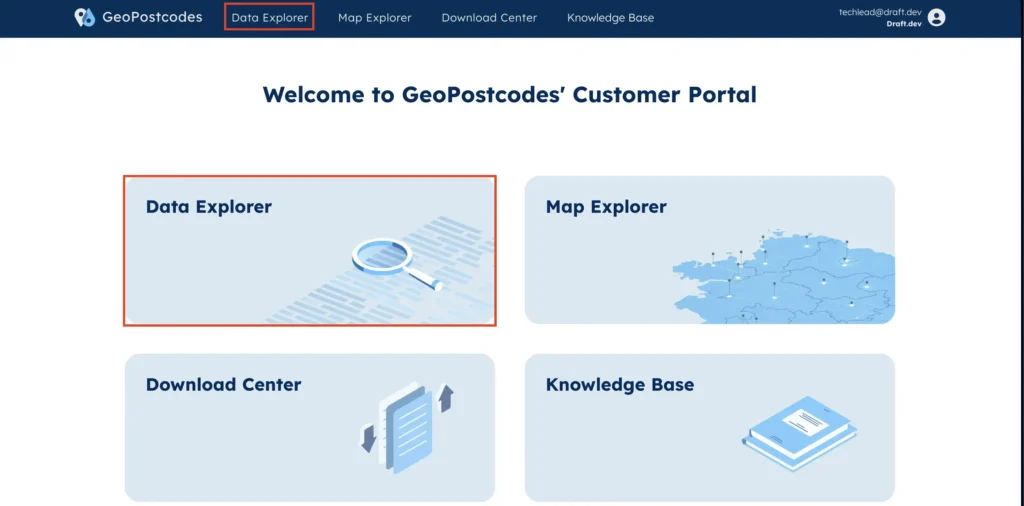
First, you’ll get the accurate address data from GeoPostcodes. Log in to your GeoPostcodes portal and navigate to Data Explorer:
Because the scenario for this guide applies to the United States and Mexico, you’ll download the samples for those countries.
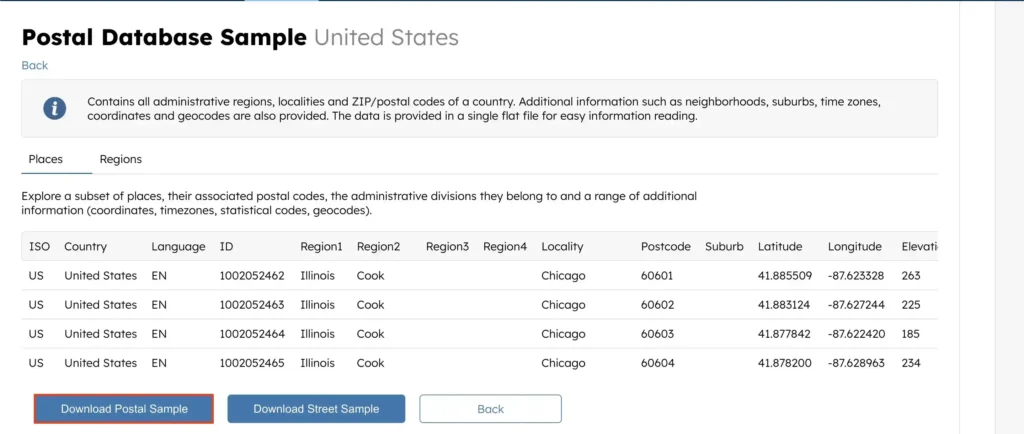
Select United States as the country/ and click Download Postal Sample.
When the zipped folder has finished downloading to your device, unzip it. The contents of the folder will look similar to the following:

Open the GPC-PLACES-GEO-SAMPLE-US.xlsx file under the XLSX folder, then save the PLACES Excel sheet as a CSV.
Do the same for Mexico. Navigate back to Data Explorer in the GeoPostcodes portal, select Mexico as the country/, and download the postal database sample for Mexico.

Unzip the downloaded folder as before and open the GPC-PLACES-GEO-SAMPLE-MX.xlsx file under the XLSX folder, then save the PLACES Excel sheet as a CSV.
When you open one of these files, you will see information related to address components with fields for country/, language, region, locality, postcode, latitude, longitude, time zone, and more. In the next steps, you will create a custom address object in Salesforce and map this data onto it so that you can use this data in Salesforce.
Set Up Salesforce Custom Address Object
To be able to use GeoPostcodes data in your Salesforce contacts, you need to configure a custom address object with an interface on Salesforce.
Log in to your Salesforce account.
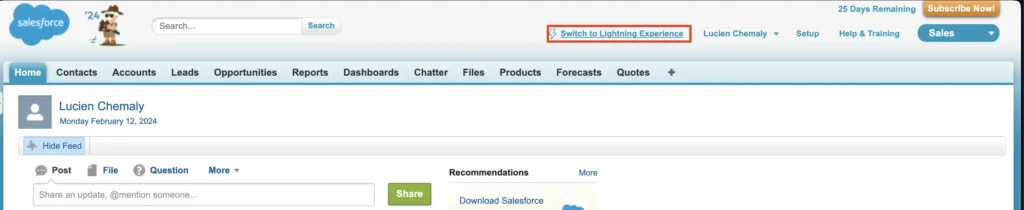
The steps below are explained using the new Lightning Experience on Salesforce. If you’re on the Classic Experience, you can click on Switch to Lightning Experience on the top bar.
Create Custom Object
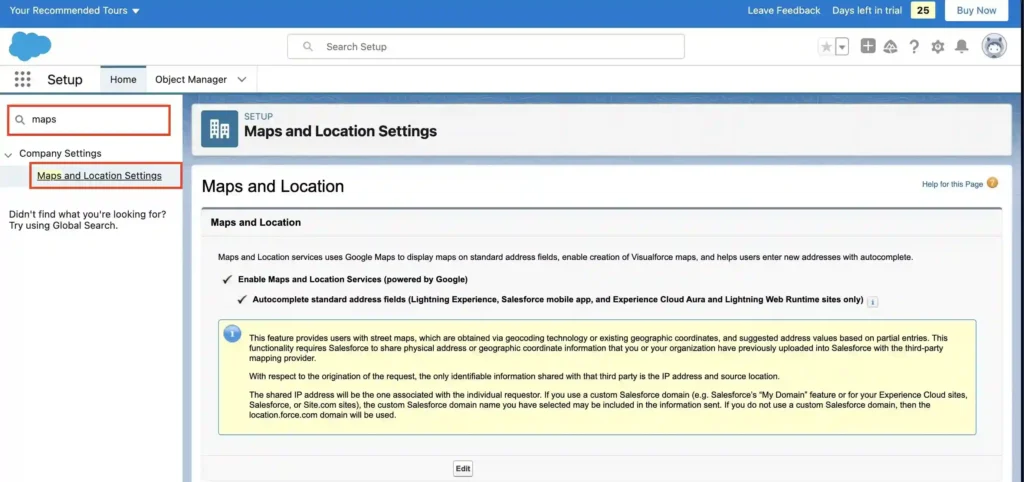
Navigate to the setup page by clicking on the settings icon and then on Setup:

Before inserting new data, check if the Google Maps setting is enabled since you will compare Google Maps addresses with the ones from GeoPostcodes later in this guide.
From the Home tab, do a quick search for Maps and Location Settings, click to open it, and verify that this feature is enabled. This is the setting that allows you to use Google APIs to autocomplete addresses on Salesforce.
Now, use the quick search to search for Object Manager and click to open it. On the Object Manager page, create a custom object by clicking Create and then Custom Object:
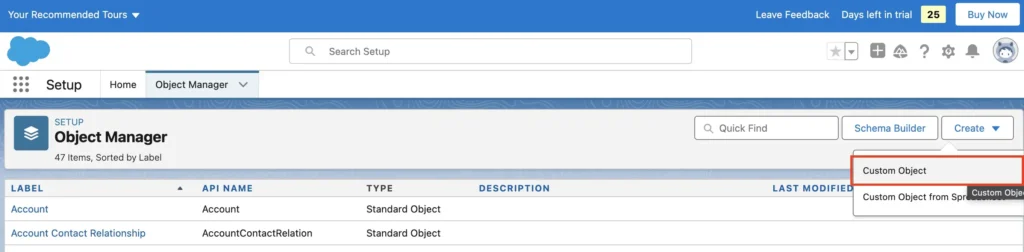
Name this custom object PostalCode. In the Search Status, enable Allow Search, which will allow you to search for this object on the user interface, and then click Save.
Configure Custom Object Fields
You now need to configure the needed fields on the PostalCode object.
Go to Fields & Relationships and click on New to create a new field.
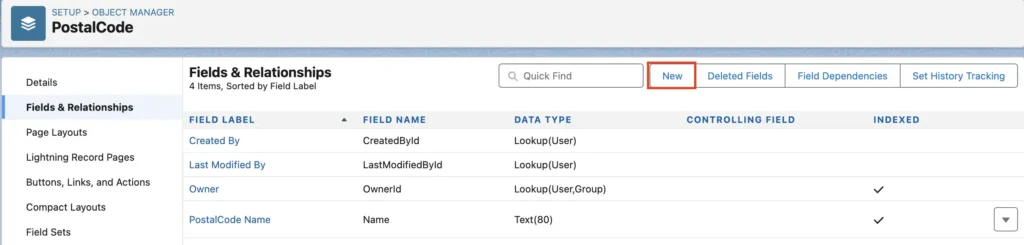
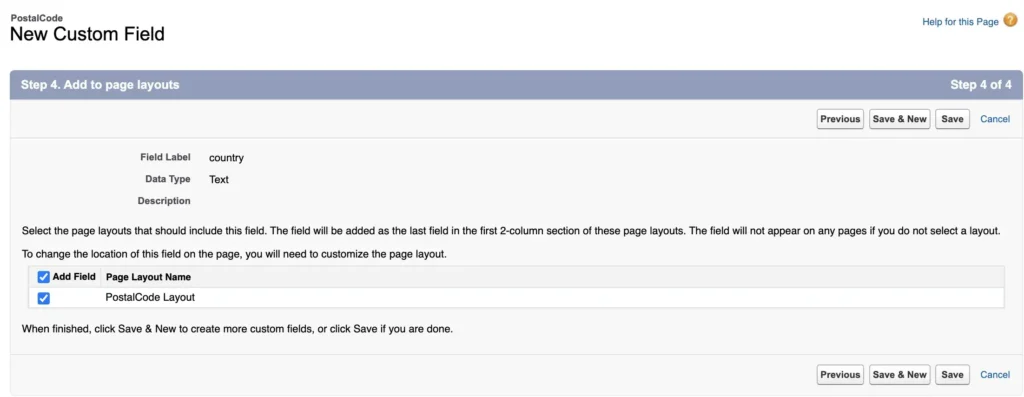
Select Text as the type and click on Next. In Field Label, put Country and set the length to 50. Keep the other settings at default, click Next twice, and then click Save.
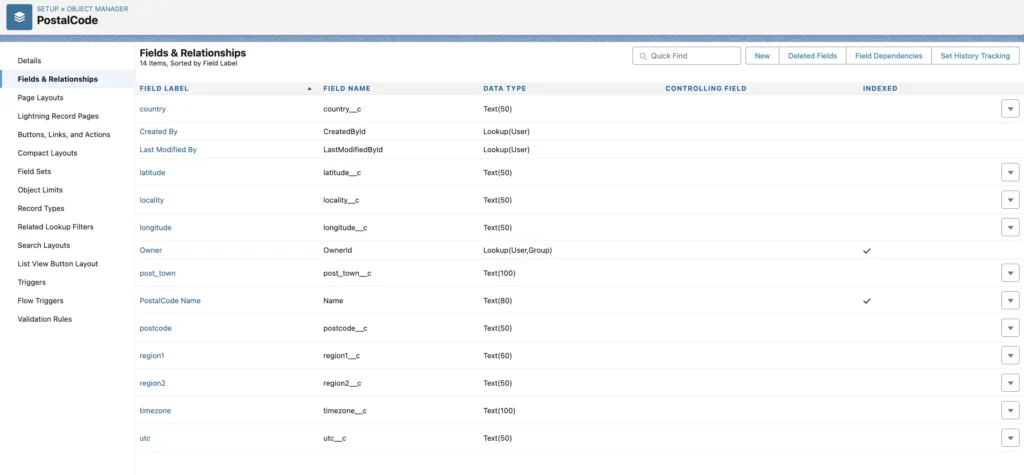
You need to follow the same process to create the other fields for this object, which are latitude, longitude, post_town, postcode, region1, region2, timezone, utc, and locality.
Using the same names for these fields as the ones in the Excel file you got from GeoPostcodes saves you from doing any manual mapping when you import the data.
Create Visuals for Custom Object
Next, you need to create some visuals for this custom object so that you can view the fields and use them in your Salesforce account.
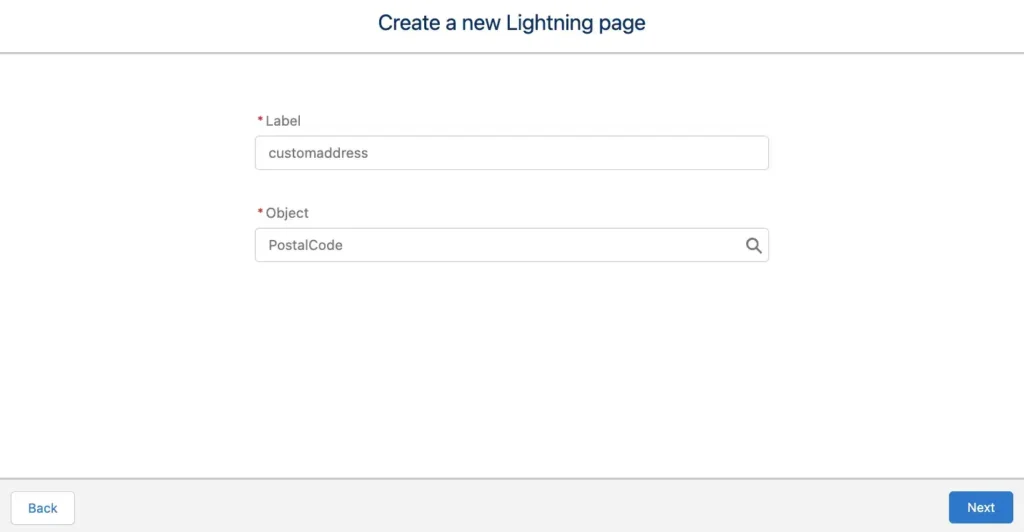
Go to the Lightning Record Pages and click on New. Select Record Page and then click Next.
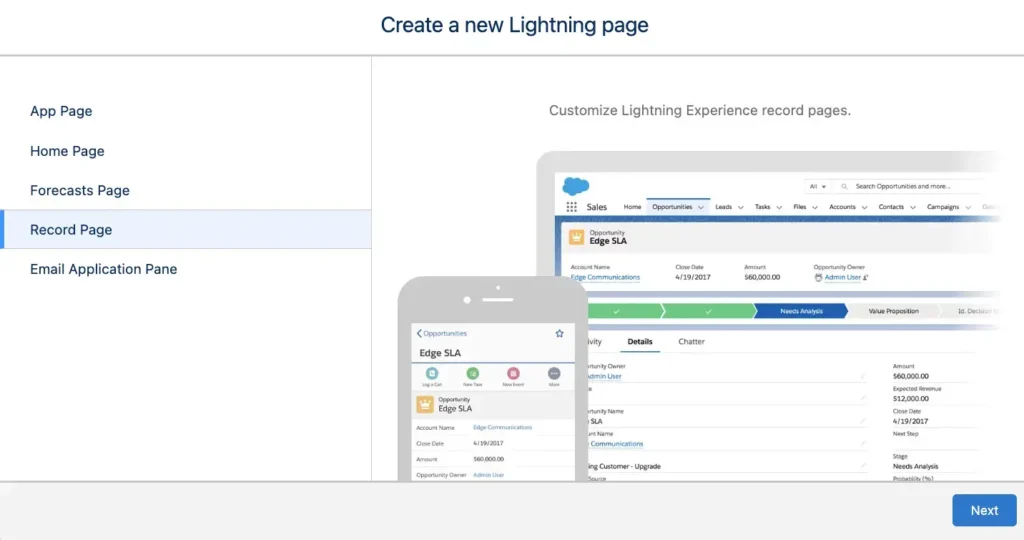
You’ll be asked to enter a name for the page and select an object. Name the page customaddress (or a name of your choice) and select the custom object you created, which is PostalCode. Then click Next and Done.
Drag and drop the Field Section into the area that says Add Component(s) Here:

Drag fields from the list on the left of your screen into the Add Component(s) Here section to have the following information:
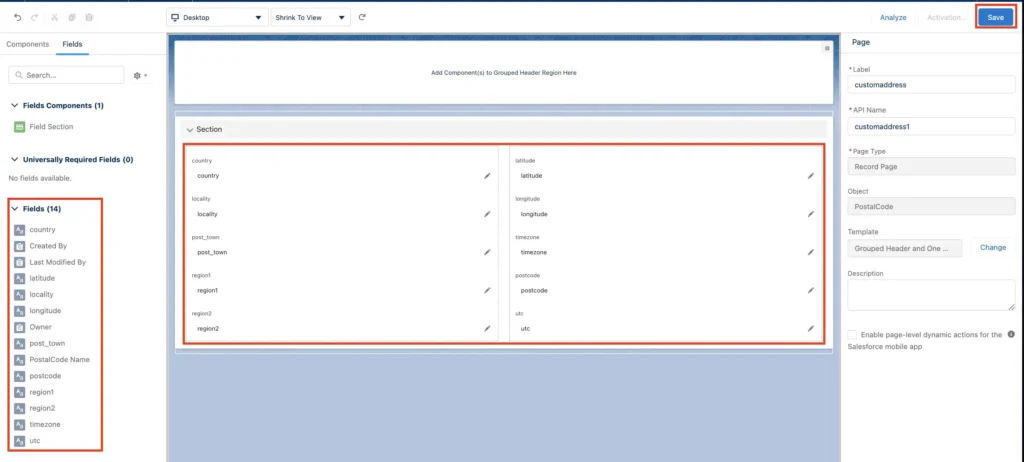
Click Save. Click on Activate when you’re prompted.
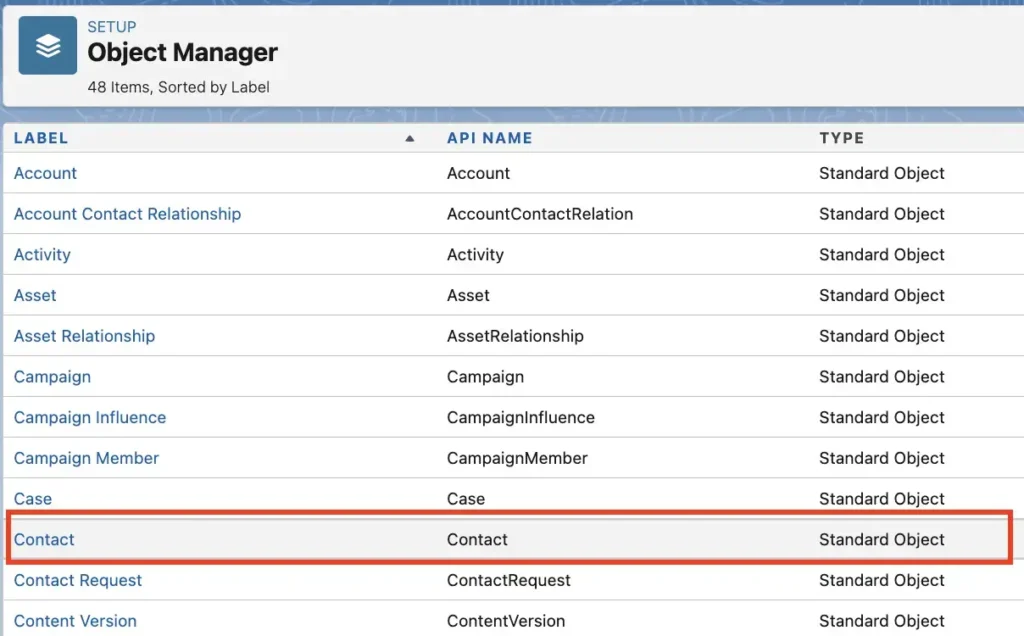
Next, you need to add the PostalCode field into the Contact object on Salesforce to be able to see it when creating a new contact. To do so, go to Object Manager and click on Contact to open it.
Go to Fields & Relationships and click on New to create a new field. Select the option Lookup Relationship:
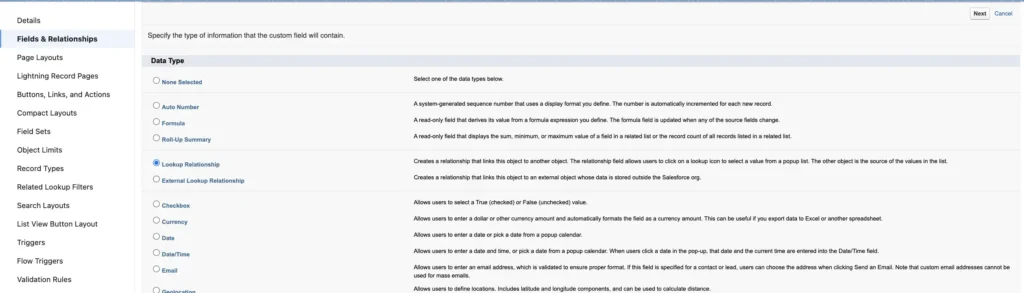
Click Next. Select the PostalCode object from the list and click Next. Use PostalCode for the Field Name and click Next. Proceed with the default settings and click Save.
You’ve now created a field named PostalCode that is linked to the custom object you created previously.
All that’s left to do is to show this field on the page layout of the contact. Go to Lightning Record Pages and click on Contact Record Page – Three Column.

Click on the Edit button, which will open the UI builder for the contact page. From the fields list under the Fields tab, select PostalCode and drag to place it on the right side of the address information section. Then click Save.
You have successfully configured the contact card with a custom address. You’re now ready to migrate the data from GeoPostcodes to Salesforce.
Migrate GeoPostcodes Data to Salesforce
In this section, you will migrate the data from GeoPostcodes into the PostalCode object in Salesforce. This will populate data in your PostalCode object so that you can add the GeoPostcodes address data to a contact through a search.
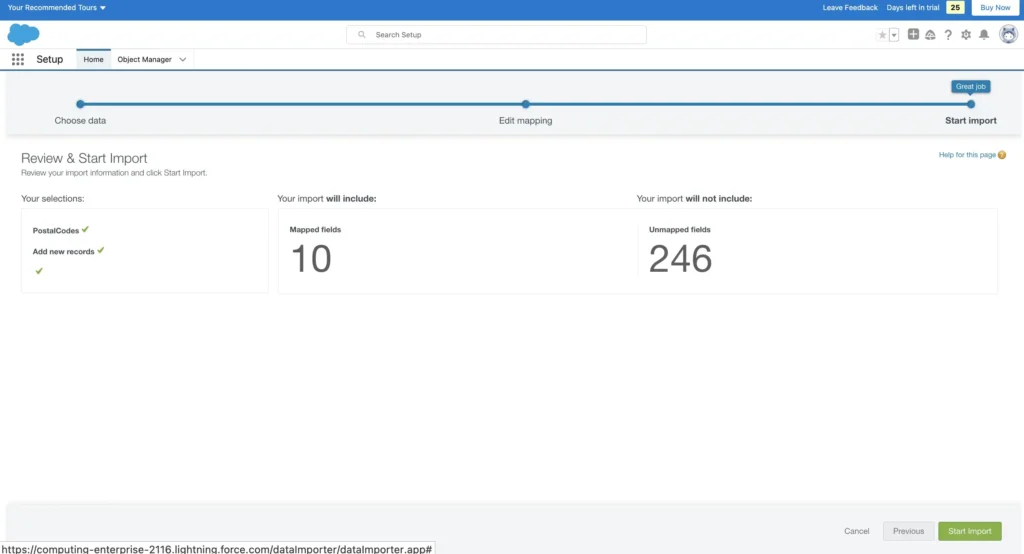
From the Setup page in Salesforce, use the quick search to search for Data Import Wizard and click to open it.
Click on Launch Wizard, select Custom objects, select PostalCodes in the In App Checklist Setting, and set Match by to Name.
Next, upload the CSV file for US addresses from GeoPostcodes and click Next.
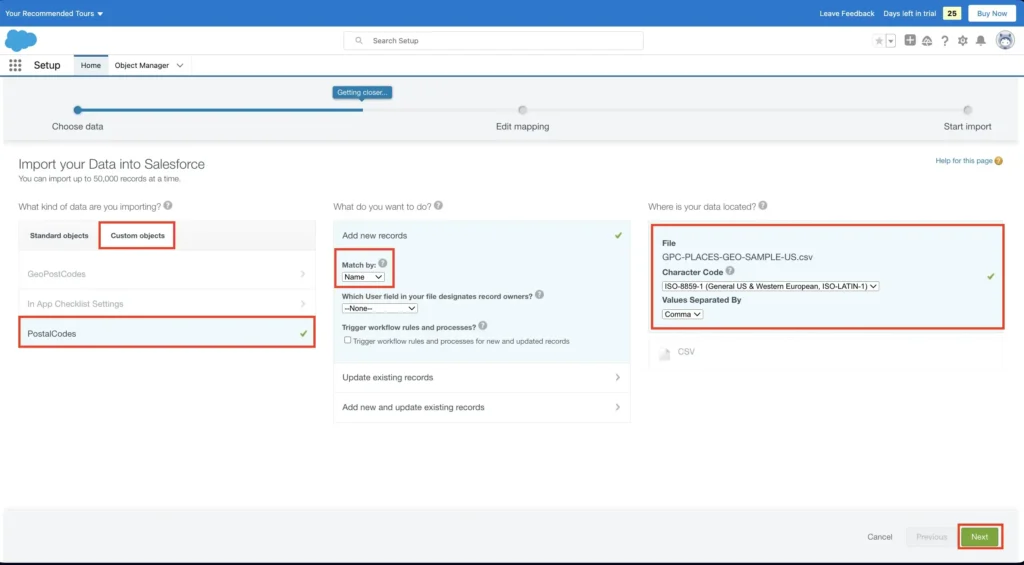
You should see the list of fields mapped automatically to your object since you used the same field names in the object as in the CSV file. However, you need to specify which object field must be used for searching.
From the mapping list, look for the postcode field and click on Change. A dialog will open to map the fields for postcode. In addition to postcode, which is already selected, select PostalCode Name, which means you will search by postal code.
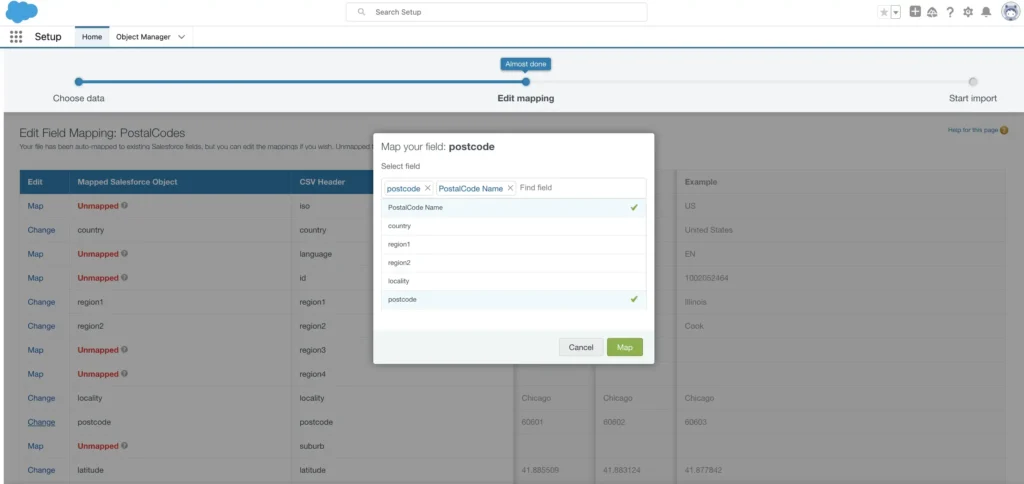
Click on Map and then on Start Import.
The import might take a few minutes. Wait for a while and then refresh your page to see that the records have been imported.
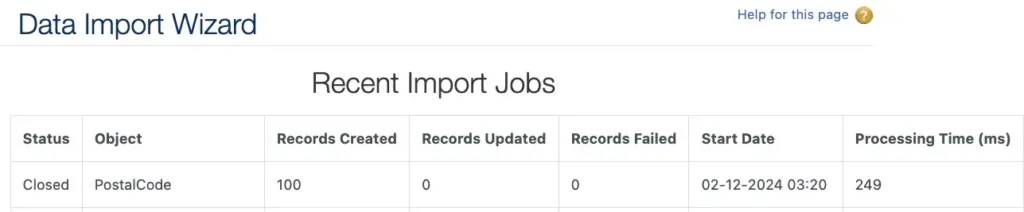
Repeat the steps above for the file with Mexico’s data.
Testing GeoPostcodes with Salesforce
Let’s see what difference the GeoPostcodes data makes to our original scenario.
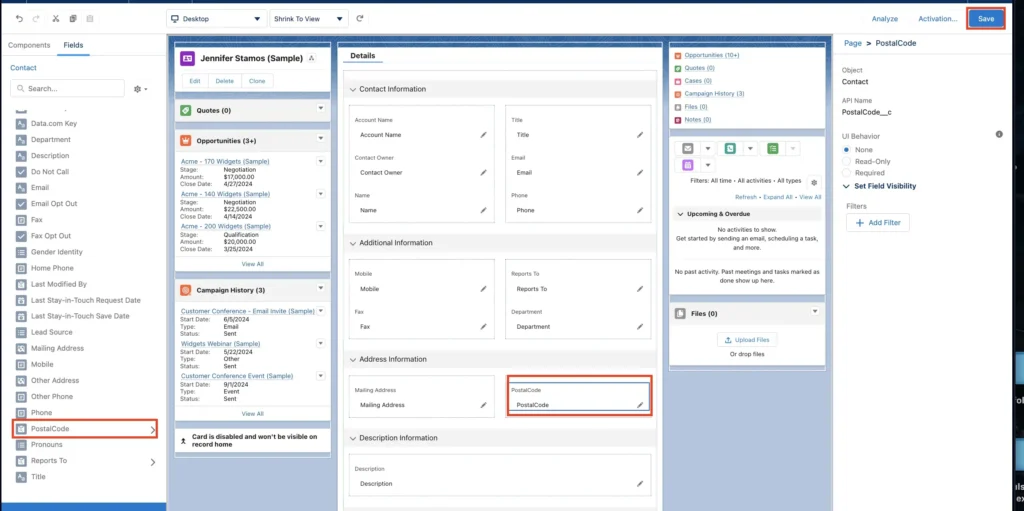
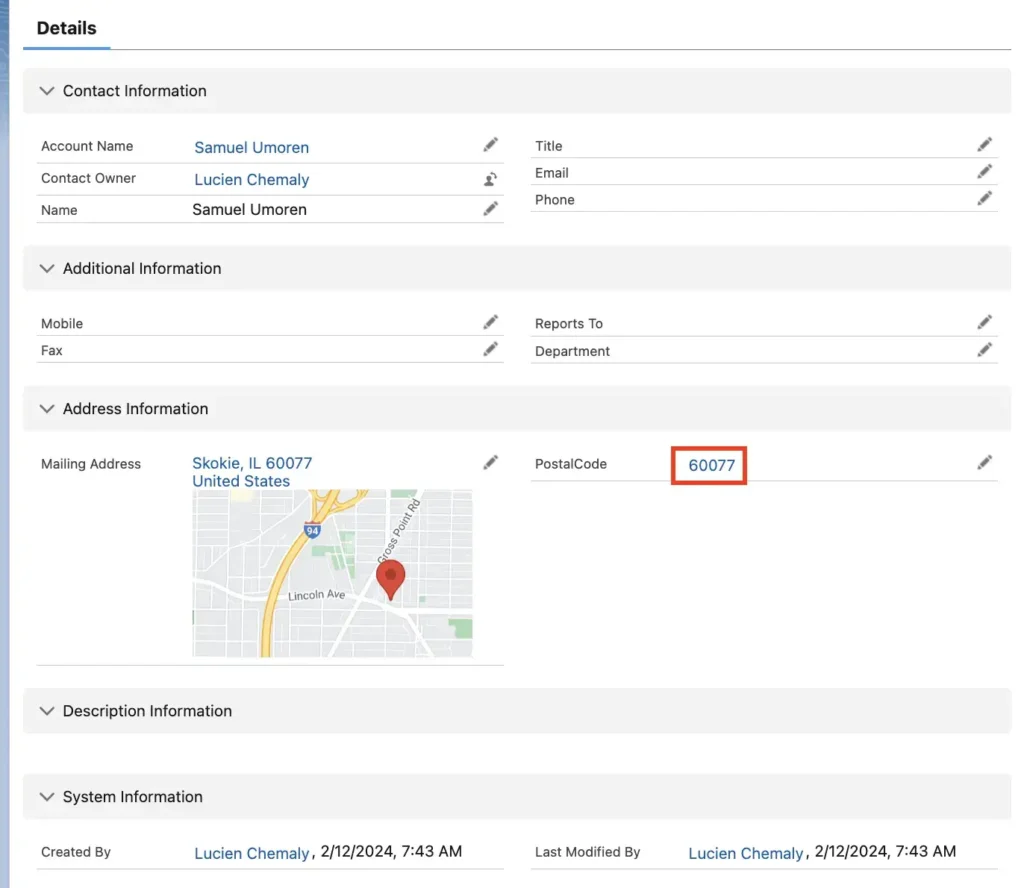
In your contacts, you will now see the address data from Google Maps in the Mailing Address field and the data from GeoPostcodes in PostcalCode.
For the contact in Chicago, you can search for the 60077 postcode in both fields and click Save. The address information from Google Maps is still the same, and there is a 60077 in the PostcalCode field that is clickable.
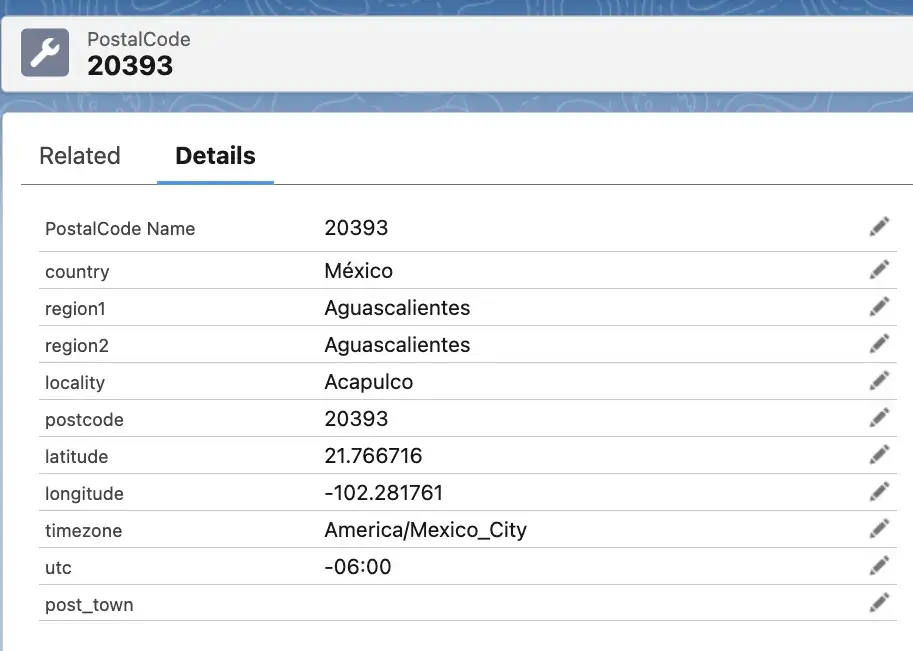
If you click on 60077, you will see a page that has all the details you mapped from GeoPostcodes.
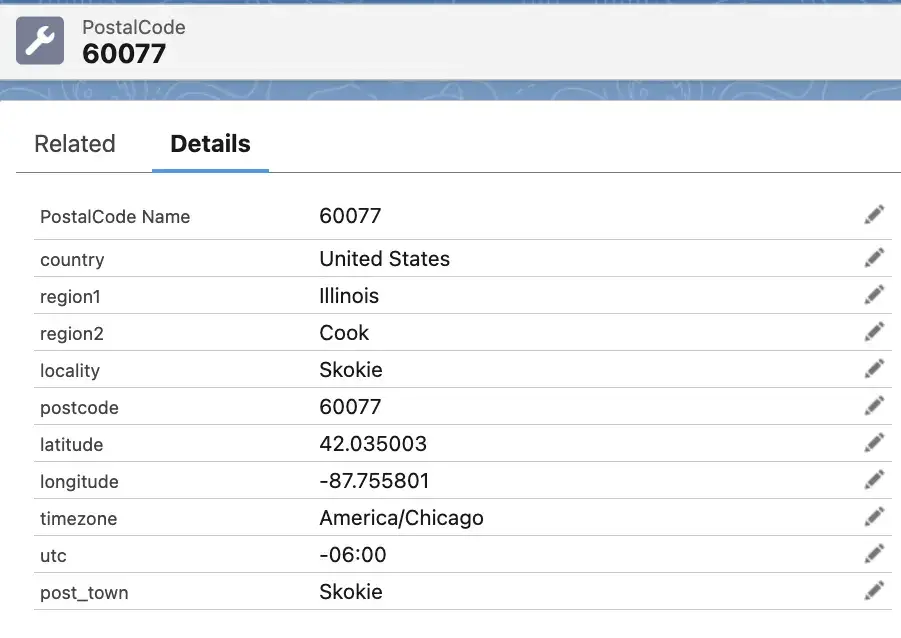
You now have information for the longitude, latitude, county, and even the time zone. This information not only helps ensure that you have the correct location but also that you schedule deliveries across time zones correctly.
Although the data from Google Maps that comes with Salesforce is useful, GeoPostcodes provides much more detail.
And what about the address in Mexico? Searching for 20393 in the Mailing Address field still returns no details. But if you search for it in the PostcalCode field, you get all the same data as you did for Chicago:
Conclusion
Validating your customers’ addresses is important for effective logistic operations, territory mapping, customer service, and fraud prevention. Autocomplete is useful, but it’s only one part of the puzzle. You need to be able to validate addresses against a reliable, comprehensive data set.
In this article, you learned how to implement address validation in Salesforce using GeoPostcodes to enhance your sales data so that you can handle complex global address data accurately. This implementation is not only about improving data quality but also about ensuring successful business operations, from logistics to customer service.
Working with international addresses daily? Say goodbye to cumbersome data correction. Verify address instantly using our on-premise location data for address validation. Check our portal to download free zip code samples.
Are you curious about unique address systems worldwide? Discover our article on how the Colombian Address Format turns streets into a precise location grid!
FAQ
How do I auto-populate an address in Salesforce?
You can use Salesforce’s built-in feature to auto-populate addresses using Google Maps.
However, if you want to have reliable global address verification, you need to integrate a complete address data set like that of GeoPostcodes.
How do I enable autocomplete in Salesforce?
You can enable Maps and Location Settings to suggest addresses from Google Maps as users type.
If you’ve enhanced your data accuracy with a custom object using a complete address database such as that from GeoPostcodes, you can configure a lookup field on your object and make the field searchable just like a zip code lookup.
What is address validation and how does it work?
Address validation is the process of verifying that a postal address exists and is deliverable.
It involves checking addresses against authoritative databases to ensure accuracy.
GeoPostcodes provides comprehensive address validation databases and address validation services that can be integrated into Salesforce for real-time verification.
Can I validate international addresses in Salesforce?
Yes, GeoPostcodes offers capabilities that support addresses from countries worldwide.
Our world postal code database covers global addressing standards.
How can I validate addresses in bulk within Salesforce?
For large-scale address validation needs, GeoPostcodes provides bulk address validation solutions that can process thousands of addresses efficiently through batch processing.